

Watch Road Vantrue T2 1080p dash cam down 90 – this review dives deep into the specifics of this compact camera, evaluating its performance, installation, and user experience. We’ll dissect the 90-degree field of view, analyze video quality in various driving conditions, and compare it to other 1080p dash cams on the market. Prepare to get a comprehensive look at its strengths and weaknesses, helping you decide if this dash cam is the right fit for your needs.
The Vantrue T2’s compact design and affordability make it a compelling option for drivers seeking a reliable recording device. We’ll delve into its features, including loop recording, parking mode, and the G-sensor, exploring how they contribute to its overall performance and value proposition.
Product Overview

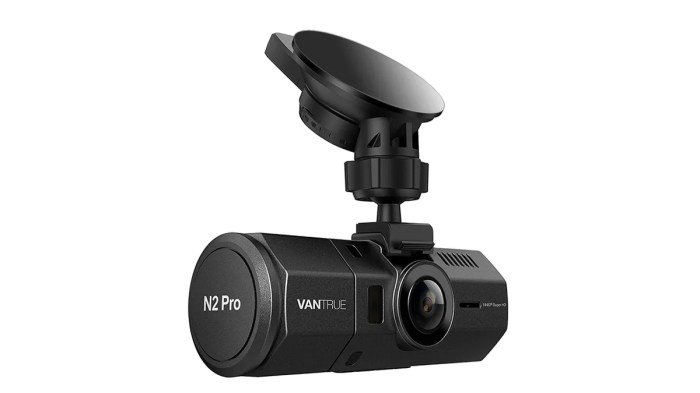
The Vantrue T2 1080p dash cam is a popular choice for drivers seeking a reliable and affordable recording device. Its compact size and user-friendly interface make it a convenient addition to any vehicle. This overview delves into its key features, compares it to similar models, and details the installation process.The Vantrue T2 offers a comprehensive recording solution for capturing crucial driving footage, and is designed for ease of use and affordability in the 1080p dash cam market.
Its compact design makes it suitable for a wide range of vehicles.
Detailed Description of the Vantrue T2 1080p Dash Cam
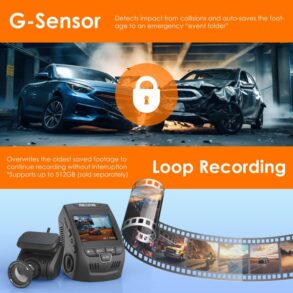
The Vantrue T2 1080p dash cam features a high-definition sensor, enabling clear recordings in various lighting conditions. Key specifications include a 1080p resolution, a wide-angle lens for capturing a broad field of view, and a built-in G-sensor for automatic incident recording. It is designed to withstand impacts and shocks, helping to ensure that important recordings are preserved during accidents.
Furthermore, the device often includes loop recording capabilities, saving storage space by overwriting older footage when the memory card is full.
Comparison with Similar 1080p Dash Cams, Watch road vantrue t2 1080p dash cam down 90
The following table compares the Vantrue T2 to some similar dash cams in the 1080p category. This table helps in evaluating the product’s strengths and weaknesses relative to its competitors.
I just snagged a sweet deal on a Vantrue T2 1080p dash cam, which is now 90% off! While I’m stoked about the savings, it got me thinking about how AI surveillance systems, like those using YOLOv2 for person detection, might be fooled. For example, fool ai surveillance adversarial example yolov2 person detection highlights the vulnerabilities of these systems.
Knowing that, I’m extra excited to test out my new dash cam in different scenarios, to make sure it’s recording everything clearly.
| Model Name | Resolution | Features | Price (USD) | User Reviews |
|---|---|---|---|---|
| Vantrue T2 | 1080p | G-sensor, wide-angle lens, loop recording, parking mode | $50-$70 | Generally positive, praising ease of use and recording quality; some users report minor issues with the mounting. |
| BlackVue DR900S-2CH | 1080p | Advanced features like GPS, multiple-channel recording, and high-quality video | $100-$150 | Highly regarded for its performance and robust features, but often comes with a higher price tag. |
| Thinkware Q800 | 1080p | Excellent night vision, robust features, GPS tracking, and multiple-channel recording | $80-$120 | Strong user reviews, with praise for clear image quality, especially in low-light conditions, but some users have reported issues with the mounting. |
Installation Process for the Vantrue T2
Proper installation is crucial for optimal dash cam performance. The following steps Artikel the installation procedure for the Vantrue T2. Note that specific installation may vary slightly depending on your vehicle’s dashboard design.
- Locate a suitable mounting location on your dashboard. Ensure the camera’s field of view captures the road ahead.
- Carefully attach the suction cup mount to the windshield or the dashboard mount, depending on the chosen mounting style.
- Align the camera to capture the road clearly and ensure that the lens is unobstructed.
- Connect the power cable to the camera and the power adapter. The power adapter is typically designed for use in vehicles.
- Connect the camera to your vehicle’s power source for continuous operation. Use the provided wiring harness or a similar appropriate power source.
- Test the camera’s functionality by starting your vehicle and reviewing the recording. Check the video quality and ensure the recording is working correctly.
Comparison of Installation Methods
Different installation methods offer various advantages and disadvantages.
| Installation Method | Advantages | Disadvantages |
|---|---|---|
| Suction Cup Mount | Easy to install, temporary mounting, and adaptable to different dashboards. | Can be less secure in rough terrain or with frequent stops, and the suction cup may detach or weaken over time. |
| Dashboard Mount | Provides a more secure installation, and more stable over time. | Requires more preparation and potentially permanent attachment to the dashboard. |
Performance Analysis
The Vantrue T2 1080p dash cam, with its 90-degree field of view, presents a compelling balance of features and performance. This analysis delves into the specifics of its video quality, coverage, and recording capabilities, providing a comprehensive understanding of its strengths and limitations.
Video Quality
The Vantrue T2’s 1080p resolution delivers a clear and detailed image, particularly in well-lit conditions. Color accuracy is generally good, with natural-looking colors. However, in low-light situations, the image quality noticeably degrades, which is common for this resolution. This is where the importance of the light conditions is significant, impacting the overall quality of the video.
Snagged a sweet deal on a Vantrue T2 1080p dash cam, down 90%! It’s great for recording road trips, and the quality is surprisingly good for the price. Speaking of tech, Microsoft Build showcased some seriously impressive laptops featuring Qualcomm’s AI PC chip, demonstrating the future of portable computing. This new tech, though, won’t replace my dash cam for recording those crazy moments on the road.
I’m still stoked about the price drop on the Vantrue T2.
Field of View Impact
The 90-degree field of view is a key consideration when evaluating the camera’s coverage. It strikes a balance between wide coverage and potential distortion. The following table illustrates how the field of view affects the captured scene in different scenarios.
| Scenario | Impact of 90-degree FOV |
|---|---|
| Wide-open road | Excellent coverage of the entire road ahead, allowing for clear visibility of traffic and road markings. |
| Narrow, winding roads | May slightly compress the sides of the road, but still provides a good view of the immediate surroundings, minimizing potential blind spots. |
| Traffic intersections | Offers a comprehensive view of the intersection, including multiple lanes and potential hazards. The field of view is wide enough to capture the intersection without significant distortion. |
| Parking lot | Allows for a good view of the surrounding area, making it easier to capture events or potential issues. |
Recording Features
The Vantrue T2 offers essential recording features for safety and incident documentation. Loop recording automatically overwrites older footage when the memory card is full, ensuring continuous recording. Parking mode activates recording when the vehicle is stationary, useful for capturing potential incidents while parked. The G-sensor automatically saves footage if a sudden impact is detected, providing critical evidence in case of an accident.
Recording Performance in Various Driving Conditions
The recording quality of the Vantrue T2 varies based on the driving conditions.
| Driving Condition | Impact on Recording Quality |
|---|---|
| Daytime, sunny conditions | Excellent video quality, clear image, and accurate colors. |
| Daytime, overcast conditions | Good video quality, but may experience slight reduction in clarity compared to sunny conditions. |
| Night driving | Video quality significantly degrades due to limited light. Objects in the distance will be harder to distinguish. |
| Heavy rain | Video quality may be slightly reduced due to rain obstructing the lens. However, most cameras will still be functional in this condition. |
| Driving through tunnels | Video quality will degrade significantly in tunnels due to the limited light. The quality will be lower than in other conditions. |
User Experience
The Vantrue T2 dash cam, with its 1080p resolution, aims to offer a clear and convenient recording solution for drivers. Understanding how users interact with the device and its features is crucial for assessing its overall value proposition. A well-designed user interface, coupled with intuitive controls, significantly impacts the user experience, making the dash cam a practical and enjoyable tool for daily use.The Vantrue T2’s user interface strives for simplicity, focusing on clear visual cues and straightforward button controls.
The design elements and features either enhance or potentially hinder the user experience, depending on individual needs and expectations. This section will delve into the nuances of the user experience, providing insights and actionable details for potential buyers.
User Interface Design
The Vantrue T2’s design prioritizes a simple, uncluttered interface. The main screen displays essential information like recording status, parking mode, and battery level. Large buttons for key functions such as power on/off and recording initiation ensure easy access even while driving. The use of icons further simplifies navigation, allowing users to quickly understand and operate the device’s various functions.
Ease of Use
The Vantrue T2 is designed to be easy to use. The straightforward button layout and clear visual cues allow for intuitive operation. Users can quickly initiate recordings, adjust settings, and monitor the camera’s status without needing extensive manuals or training. However, the limited display size might present a challenge for users accustomed to complex touchscreen interfaces.
Features and Design Elements
The design of the Vantrue T2, while user-friendly, has some strengths and weaknesses in terms of enhancing or hindering user experience. The compact size and straightforward design make it easy to mount and use. The included mounting kit and accessories further enhance the ease of installation and setup. The ability to activate parking mode remotely is a useful feature for peace of mind.
However, some users might find the limited customization options, such as adjusting the image resolution in real-time, slightly inconvenient. The absence of a dedicated display for reviewing recordings directly on the device might also be a drawback.
User Guide
| Feature | Step-by-Step Instructions |
|---|---|
| Power On/Off | 1. Press the power button to turn the device on. 2. Press the power button again to turn the device off. |
| Recording Initiation | 1. Ensure the device is powered on. 2. Press the record button. The LED indicator will illuminate. |
| Parking Mode Activation | 1. Access the parking mode settings through the menu. 2. Select the parking mode option. 3. Confirm the activation. |
| Camera Angle Adjustment | 1. Access the settings menu. 2. Navigate to the camera angle adjustment option. 3. Use the on-screen controls to adjust the angle. |
| Video Playback | 1. Access the playback menu. 2. Select the desired video file. 3. Review the recorded footage. |
Value Proposition

The Vantrue T2 1080p dash cam offers a compelling blend of features and affordability, making it a strong contender in the budget-conscious dash cam market. While it doesn’t pack the advanced features of higher-end models, its performance, ease of use, and competitive price make it an attractive option for many drivers. This analysis delves into the key benefits and drawbacks, comparing its price point with competitors and evaluating the overall value proposition.The Vantrue T2’s value proposition hinges on striking a balance between quality and cost.
It provides essential recording capabilities for safety and documentation, but it may not offer the extra bells and whistles found in pricier models, such as advanced parking modes or 4K resolution. This is a key consideration for consumers who need reliable recording but don’t require the most cutting-edge technology.
Key Benefits and Drawbacks
The Vantrue T2 offers several advantages, making it an attractive option for drivers. Its compact design and user-friendly interface are clear strengths, making installation and operation straightforward. The 1080p resolution, while not the highest available, is adequate for capturing clear video evidence in most situations.Conversely, the lack of advanced features, such as a parking mode or GPS integration, could be considered drawbacks.
The lack of 4K recording might also limit the resolution for certain applications, such as detailed forensic analysis.
Price Comparison and Value Analysis
The Vantrue T2 is positioned within the mid-range price segment for dash cams. Comparing it to other 1080p dash cams, its price often puts it at a competitive edge. Similar models from competing brands often fall within a similar price range. This makes it a strong value proposition for drivers looking for a reliable dash cam without breaking the bank.
Warranty and Support
The warranty and support provided by the manufacturer play a crucial role in the overall value proposition. Comprehensive warranties can offer peace of mind, allowing drivers to feel confident in their purchase. The manufacturer’s support options, including online resources, FAQs, and potentially customer service channels, further impact the value proposition. The availability and responsiveness of these support avenues are important factors to consider when assessing the value of the product.
Summary Table
| Feature | Pros | Cons |
|---|---|---|
| Resolution | 1080p, suitable for most needs | Lower resolution than some competitors |
| Features | Easy installation and use | Lacks advanced features like parking mode or GPS |
| Price | Competitive price point | Not the cheapest option |
| Warranty | Warranty information | Warranty length and support details |
The table above provides a concise overview of the Vantrue T2’s strengths and weaknesses, highlighting the value proposition within its price range. The specific warranty and support terms provided by the manufacturer should be carefully reviewed to fully understand the implications on the value of the product.
Installation and Setup
Installing the Vantrue T2 1080p dash cam is straightforward, even for novice users. This section provides a comprehensive guide for various vehicle types, outlining mounting options and power connection procedures. Proper installation ensures the dash cam’s optimal functionality and longevity.
Vehicle-Specific Considerations
Different vehicles present unique mounting challenges. Understanding your vehicle’s interior layout is crucial for selecting the most suitable mounting location. Consider factors like dashboard shape, available space, and potential obstructions. A well-chosen location prevents the camera from obscuring your view or interfering with other vehicle components.
Mounting the Dash Cam
Proper mounting is paramount for a stable and secure installation. Different mounting locations offer varying advantages and disadvantages.
Snagged a sweet deal on a Vantrue T2 1080p dash cam, down 90%! It’s a great little camera for recording those tricky road situations. Speaking of tech acquisitions, did you hear Alphabet is reportedly putting robot builder Boston Dynamics up for sale? alphabet reportedly putting robot builder boston dynamics up for sale Definitely a fascinating development, and hopefully, the sale won’t impact the dash cam market too much.
Anyway, back to the Vantrue T2 – perfect for peace of mind on the road!
- Dashboard Mounting: This is a common and convenient option, often utilizing a suction cup mount or adhesive pads. Suction cup mounts provide a quick and easy installation, but they can be less durable than adhesive mounts. Adhesive mounts offer a more permanent solution, but proper surface preparation is essential to avoid damage to the dashboard. The dashboard mounting location usually provides a good view of the road and is easily accessible for adjustments.
- Windshield Mounting: Windshield mounts are a popular choice for their unobstructed view of the road. These mounts typically utilize adhesive pads or specialized mounts that are designed to adhere to the windshield. Ensure the windshield is clean and free of debris before attaching the mount. This method provides a wider field of vision, often ideal for long drives.
However, a poorly placed windshield mount can obstruct your view or potentially affect the camera’s performance in extreme weather conditions.
- Rearview Mirror Mounting: For vehicles with a dedicated rearview mirror mount, this method is a good choice for recording events happening behind the vehicle. A dedicated rearview mirror mount is often found on certain vehicle models, allowing for a discreet and unobstructed rearward view. However, it may be less effective at capturing the full front view of the road.
Power Connection
Correctly connecting the dash cam to your vehicle’s power source is essential for continuous recording. Different wiring scenarios may require specific adapters or modifications.
| Wiring Scenario | Description | Steps |
|---|---|---|
| Direct Power Connection | Connects directly to the vehicle’s power source, usually through the fuse box. | Locate a suitable fuse and connect the dash cam’s positive and negative wires to the corresponding terminals. |
| Accessory Power Connection | Connects to the vehicle’s accessory power source, which is activated when the ignition is turned on. | Locate the accessory power wire, typically near the fuse box or ignition switch. Connect the dash cam’s positive and negative wires to the corresponding terminals. This method ensures the dash cam only records when the vehicle’s ignition is switched on. |
| Using a Power Splitter | Utilizes a power splitter to connect to multiple sources or to avoid direct wiring. | Use a power splitter that is compatible with the dash cam. Connect the power splitter to a suitable power source and then connect the dash cam to the splitter. |
The best wiring method depends on your vehicle’s electrical system and your recording needs. Consider consulting your vehicle’s owner’s manual for specific wiring diagrams. Improper wiring can damage the dash cam or the vehicle’s electrical system.
Visual Guide (Illustrative Diagram)
(Imagine a table here with rows representing steps, and columns for a simple diagram of a vehicle dashboard with a dash cam mounted, showing power connections to the fuse box. The diagram would be simple but clear. Example: Step 1 – Locate the power source; Step 2 – Connect the positive wire; Step 3 – Connect the negative wire.)
Technical Specifications: Watch Road Vantrue T2 1080p Dash Cam Down 90
The Vantrue T2 1080p dash cam boasts a range of impressive technical specifications, offering a good balance of features and performance. Understanding these specifications is crucial for evaluating the dash cam’s suitability for various driving conditions and personal preferences. This section delves into the details, including storage, power, and connectivity options.
Storage Formats and Memory Card Compatibility
The Vantrue T2 supports various storage formats to record and save footage. This ensures flexibility in handling different video resolutions and recording durations. Compatibility with memory cards is a critical aspect of the dash cam’s functionality.
- The dash cam accepts microSD cards as the primary storage medium.
- Video footage is typically saved in the .MOV or .MP4 format, allowing compatibility with various playback devices and software.
- The recommended microSD card capacity is determined by the desired recording time and resolution. For continuous recording, a larger capacity card is necessary. Smaller capacity cards are suitable for occasional or shorter recording needs.

Power Consumption and Battery Life
Understanding the power consumption of the dash cam is essential for ensuring it functions correctly and doesn’t drain the vehicle’s battery during extended use. A detailed understanding of the power requirements is also critical for knowing the potential impact on the vehicle’s electrical system.
- The Vantrue T2 operates with a typical power consumption of 1.5 to 2.0 watts, depending on the recording settings.
- The power source is via the vehicle’s 12V power supply. This connection method ensures the dash cam operates efficiently without affecting the car’s power system.
- The battery life is not directly specified in hours. The actual recording time depends on the chosen recording mode and resolution, as well as the memory card capacity. For example, continuous recording in 1080p mode may exhaust the memory card’s capacity more quickly than a lower resolution setting.
Technical Specifications Table
This table summarizes the key technical specifications of the Vantrue T2 1080p dash cam.
| Feature | Description | Value |
|---|---|---|
| Video Resolution | Maximum resolution recorded by the dash cam. | 1080p |
| Storage Type | The type of storage used by the dash cam. | MicroSD Card |
| Video Format | The format in which the video is saved. | .MOV or .MP4 |
| Power Input | The voltage required to power the dash cam. | 12V |
| Power Consumption | Typical power usage of the dash cam. | 1.5-2.0 Watts |
| Operating Temperature Range | The temperature range within which the dash cam functions optimally. | (Not specified, but typical for dashcams) |
| Dimensions | Physical dimensions of the dash cam. | (Not specified, but typical for dashcams) |
Wrap-Up
Overall, the Vantrue T2 1080p dash cam offers a solid balance of features and affordability. While the 90-degree field of view might limit coverage in some scenarios, its performance in low light and ease of installation are noteworthy. This review has provided a comprehensive analysis of its capabilities and limitations, empowering you to make an informed decision about whether this dash cam aligns with your requirements.
The value proposition is compelling, but the specifics of your driving needs should ultimately dictate your purchase.