


Add a signature to your microsoft outlook emails heres how – Add a signature to your Microsoft Outlook emails: here’s how to make a professional impression with personalized signatures. From basic design to advanced features, we’ll guide you through creating email signatures that are both visually appealing and functional. Learn how to add contact information, links, and social media profiles to elevate your email communication. We’ll cover everything from crafting the perfect layout to ensuring your signature is mobile-friendly.
This comprehensive guide will walk you through every step, from creating a simple signature to managing multiple signatures for different accounts. You’ll learn how to add contact details, links, and social media profiles, all while optimizing for readability and a professional aesthetic. Whether you’re a seasoned professional or just starting out, these techniques will help you create signatures that reflect your brand and boost your communication.
Adding a Signature to Outlook Emails
Adding a signature to your Outlook emails is a crucial aspect of professional communication. A signature provides a quick and consistent way to include your contact information, branding, and any relevant details. This enhances professionalism and ensures your recipients always have the necessary information at hand. It’s also an excellent way to maintain brand consistency across all your communications.Adding a signature is straightforward and can significantly streamline your email workflow.
This guide will walk you through the process of adding a signature to new emails, existing templates, and modifying existing signatures to suit different needs.
Adding a Signature to a New Email Message
This process allows you to include a signature automatically at the end of every new email you compose.
- Open Outlook and compose a new email message.
- In the email window, locate the “Signature” option. This usually appears in the options ribbon at the top of the screen. It’s often located in the “Options” tab or “Message” tab. If you can’t find it there, check the “File” or “Insert” tabs, as the location might vary depending on your Outlook version.
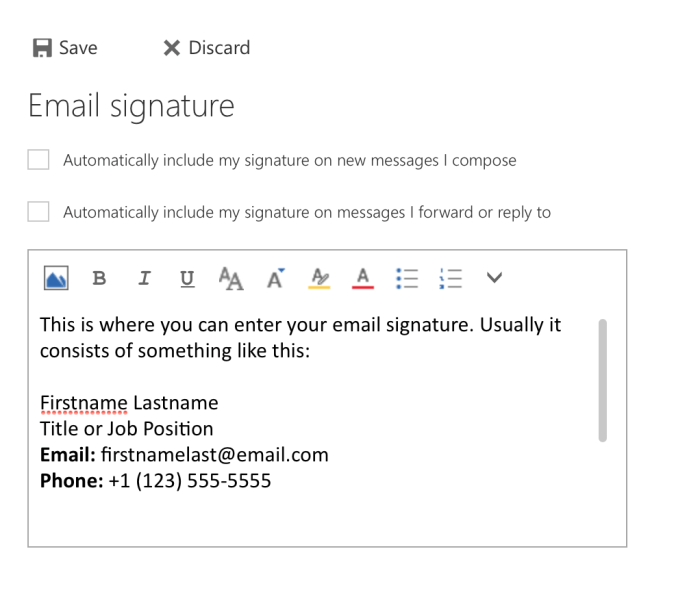
- Select “Signatures”. A new window will open, allowing you to manage your signatures.
- Click “Signatures” in the ribbon. This will open the Signature dialog box.
- Choose the signature you want to use from the dropdown menu. If you don’t have one yet, select “New”.
- In the “Edit Signature” dialog box, type the content you want for your signature. This might include your name, title, company, phone number, email address, and website.
- Click “OK” to save the new signature.
- From the signature dialog box, select your newly created signature from the dropdown menu, and click “OK”.
- Compose your email, and your signature will automatically be appended to the end.
Adding a Signature to an Existing Email Template
Email templates can save time and ensure consistency in your communications. Adding a signature to an existing template ensures your contact information is automatically included in all emails based on that template.
Want to add a professional touch to your Microsoft Outlook emails? It’s surprisingly easy! While you’re fiddling with email formatting, you might also want to check out when your Xiaomi Redmi or Poco phone will get the MIUI 12 update here. Once you’ve got your signature sorted, you’ll be sending emails like a pro in no time!
- Open Outlook and access the email template you wish to modify.
- Locate the “Signature” options within the template’s editing window.
- Select the desired signature from the dropdown menu, or create a new signature if needed.
- Adjust the signature content as necessary.
- Save the email template.
- From now on, when using the template, your signature will be automatically included.
Modifying Existing Signatures for Different Purposes
This process allows you to tailor signatures for different email types or communication styles.
- Open Outlook and access the “Signatures” dialog box.
- Select the signature you wish to modify.
- Edit the signature content to reflect the specific purpose or audience.
- Save the modified signature.
- Select the modified signature for use in future emails.
Integrating Contact Information into Signatures
Adding a professional touch to your Outlook emails is essential for establishing credibility and maintaining a strong brand image. A well-crafted signature, beyond just your name, can effectively convey your contact information, making it easier for recipients to connect with you. This section delves into the specifics of integrating contact details into your Outlook email signature, ensuring clarity, professionalism, and accessibility.Incorporating your contact information into your email signature is more than just listing your details; it’s about optimizing readability and providing a seamless way for recipients to reach you.
This often involves strategic formatting, the use of Outlook’s built-in contact card system, and a mindful selection of contact details to include.
How to Incorporate Contact Details, Add a signature to your microsoft outlook emails heres how
To make your contact information readily available, you need to strategically integrate your phone number, address, and website. Start by deciding which details are most relevant to your professional context.
- Phone Number: Include your preferred phone number, especially if you are actively seeking to be reached by phone. Avoid including personal or home numbers unless it’s appropriate for your business relationship.
- Address: If your business requires a physical address for correspondence, include it. If your business is online-only, you can choose to omit it. Clearly format the address for easy readability, following the standard format for postal addresses.
- Website: Your company or personal website is often a critical element for professional contact. Include the link to your website, ensuring it is a relevant and up-to-date address.
Formatting for Readability
Optimal readability is key to making your signature useful. Use consistent formatting throughout your signature to avoid visual clutter. This involves using clear spacing, fonts, and sizes.
- Font and Size: Choose a professional font and a readable font size. Avoid overly decorative or difficult-to-read fonts. The font should complement your email theme and overall branding.
- Spacing: Use appropriate spacing between different elements in your signature. Avoid overcrowding or making the signature too cramped.
- Visual Hierarchy: Structure your contact information in a way that guides the recipient’s eye. Use headings or bullet points for different types of contact details.
Utilizing the Outlook Contact Card
The Outlook contact card feature is a powerful tool for automatically populating contact information within your signature. This method streamlines the process and ensures accuracy.
- Connecting to Contact Card: Within your Outlook signature settings, you can integrate the contact card to pull your contact information directly. This method automatically updates your signature with any changes to your contact information.
- Customizing Display: Customize the way your contact details are displayed within the signature. You can select which information from your contact card is visible in your signature.
- Maintaining Accuracy: Regularly review and update your Outlook contact information to ensure accuracy in your email signatures.
Best Practices for Contact Details
Following best practices will help ensure your contact details are useful and appropriate. Consider these elements when designing your signature.
Adding a signature to your Microsoft Outlook emails is super easy! It’s a quick way to personalize your correspondence, and it’s a great way to add a touch of holiday cheer, like in the movie script excerpt for Mariah Carey’s “All I Want for Christmas Is You” here. Just follow the simple steps and you’ll be sending professional, festive emails in no time.
Plus, it’s a simple way to ensure your contact information is readily available.
- Relevance: Prioritize the most relevant contact details for your professional context. If you are primarily communicating online, consider omitting your physical address.
- Accuracy: Double-check the accuracy of all contact information before saving the signature. Incorrect or outdated information can be detrimental.
- Consistency: Maintain consistent formatting and style throughout all your communications.
Sample HTML Table Structure
A well-structured HTML table can significantly enhance the readability and visual appeal of your contact information.
Phone (123) 456-7890 [email protected] Website www.yourwebsite.com Address 123 Main Street
Anytown, CA 12345
Including Links and Social Media Profiles in Signatures: Add A Signature To Your Microsoft Outlook Emails Heres How

Adding links to your website or social media profiles in your Outlook email signature can significantly enhance your professional image and expand your online presence. It provides a convenient way for recipients to connect with you beyond the email exchange, potentially leading to collaborations, partnerships, or even new business opportunities. A well-integrated signature can leave a lasting impression and make you more approachable.This section will delve into the best practices for incorporating links and social media icons into your Outlook email signature, ensuring they are both visually appealing and easily accessible.
We’ll explore formatting techniques, icon choices, and comparison of different methods to achieve a cohesive and professional look.
Benefits of Including Links
Including links to your website or social media profiles in your email signature offers several advantages. It provides a direct route for recipients to learn more about your work, explore your expertise, or connect with you on other platforms. This visibility fosters professional networking and can facilitate future collaborations. Potential clients or collaborators can easily access your online presence and gain a better understanding of your offerings.
Formatting Links for Readability
For optimal readability, keep links concise and descriptive. Instead of a long, cryptic URL, use a clear and informative text representation. For example, instead of “http://www.yourwebsite.com”, use “My Website.” This makes the link more user-friendly and less intimidating. Avoid using generic terms like “My Portfolio” if the link doesn’t actually lead to a portfolio page. Maintain consistency in your link formatting across all your communication channels for a unified brand identity.
Adding a signature to your Microsoft Outlook emails is pretty straightforward. It’s a helpful way to personalize your correspondence. However, if you’re looking to add a user to your Alexa household, you’ll find detailed instructions on how add user your alexa household. Once you’ve got that sorted, you can get back to making your Outlook signatures even more professional and effective.
Best Practices for Adding Social Media Icons
Using social media icons alongside your links is a great way to make your signature visually appealing and instantly recognizable. Choose icons that align with your brand and are easily recognizable. Maintain a consistent style across all your social media profiles. Avoid using overly complex or abstract icons that might not be easily understood. Size the icons proportionally to the text in your signature, ensuring they don’t overwhelm or appear out of place.
Comparing Methods for Including Links
Several methods can be used to include links and social media profiles in your Outlook email signature. The most common include using hyperlinks within your signature text, using a signature block with formatted HTML, and using a dedicated signature management tool. The best method depends on your technical proficiency and the complexity of your signature design. Consider the learning curve, the flexibility, and the level of customization offered by each method when making your choice.
Sample HTML Table Structure
A well-structured HTML table can neatly arrange links and social media icons within your signature. This method allows for precise control over the layout and appearance. A table structure is particularly helpful for aligning elements like icons and their corresponding links. Here’s a sample structure:
This example showcases how links and social media icons can be organized within a table, enhancing readability and visual appeal. Adjust the `src` attributes to reflect the actual paths to your icons. The `target=”_blank”` attribute ensures that links open in a new tab or window, preventing the email client from navigating away from the email.
Managing Multiple Signatures in Outlook
Adding a signature to your emails is a professional touch, but what if you need different signatures for different accounts or purposes? Outlook allows for multiple signatures, providing flexibility and a streamlined approach to professional communication. This section delves into the intricacies of managing these diverse signatures, empowering you to craft distinct email identities for various contexts.
Creating and managing multiple signatures in Outlook provides significant advantages. By assigning specific signatures to particular email accounts or contexts, you maintain a consistent brand image across various communications. This ensures that your emails are not only professional but also reflect the appropriate context, from formal business correspondence to informal team updates.
Creating Multiple Signatures
Outlook allows users to create multiple signatures for different purposes. This flexibility enables users to tailor their signatures to suit specific email accounts or communication contexts. For example, a user might have a signature designed for professional client communications that differs from one used for internal team discussions.
Assigning Signatures to Email Accounts
To assign a signature to a specific email account, navigate to the email account settings. The exact steps may vary slightly depending on the Outlook version. However, the general procedure involves accessing the account settings and locating the signature options. Within these options, you’ll find the capability to select and apply a pre-existing signature or create a new one.
Step-by-Step Guide to Managing Multiple Signatures
- Open Outlook and access the email account settings.
- Locate the “Signatures” option within the email account settings. This location may vary depending on the Outlook version.
- Select the signature you wish to apply to the email account.
- If a new signature is required, click “New” to create a new signature.
- Compose the desired signature content, including contact information, links, and other details.
- Save the new signature.
- Select the saved signature in the signature options and apply it to the corresponding email account.
- Repeat steps 1-7 for each email account needing a different signature.
Best Practices for Signature Management
Consistent branding is crucial. Use a consistent font, color scheme, and layout across all signatures. Avoid clutter; keep signatures concise and easy to read. Ensure that the information in your signatures is accurate and up-to-date. Regularly review and update your signatures to reflect any changes in contact information or professional details.
Comparison of Signature Management Options in Outlook
| Feature | Option 1 (Default Outlook Method) | Option 2 (Advanced Outlook Method) |
|---|---|---|
| Number of Signatures | Multiple signatures can be created and assigned | Multiple signatures can be created and assigned |
| Customization | Standard customization options available | Advanced customization options available |
| Integration with other features | Integrates with other Outlook features | Integrates with other Outlook features |
| Ease of Use | Generally straightforward | Potentially more complex for non-technical users |
Last Point
In conclusion, adding a professional email signature to your Microsoft Outlook emails is a simple yet impactful way to enhance your communication. By following the steps Artikeld in this guide, you can create personalized signatures that effectively communicate your contact information, links, and social media profiles. We covered everything from creating a basic design to managing multiple signatures for different accounts, ensuring your signature is mobile-friendly, and improving readability.
This comprehensive guide will leave you empowered to create impactful email signatures that reflect your professionalism and enhance your overall communication.