


How use Zoom Chromebook? This comprehensive guide will walk you through every step of using Zoom on your Chromebook, from initial setup to advanced features like screen sharing and troubleshooting common issues. We’ll cover everything you need to know to make your Zoom experience seamless and secure.
From connecting to a meeting to mastering the chat function, this guide provides a practical, step-by-step approach to using Zoom on your Chromebook. We’ll delve into audio and video settings, explore different screen sharing options, and offer tips for troubleshooting common problems.
Initial Setup and Connection
Getting your Chromebook ready for Zoom meetings is straightforward. This guide provides a step-by-step approach to ensure a seamless experience. From installing the Zoom app to troubleshooting potential issues, we’ll cover everything you need to know to make the most of your Chromebook’s video conferencing capabilities.
Installing the Zoom Application
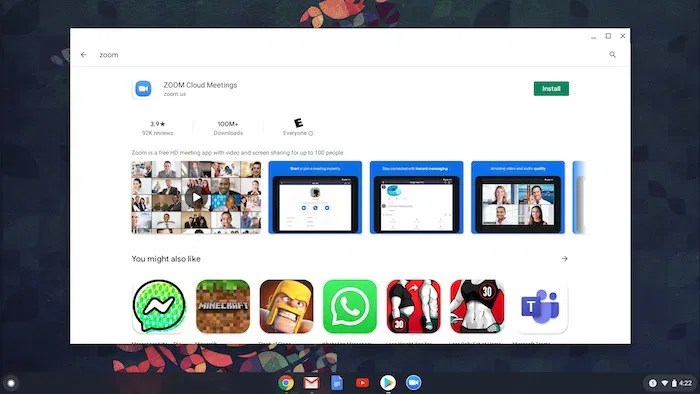
The Zoom application needs to be downloaded and installed on your Chromebook to facilitate video conferencing. Chromebooks rely on the Chrome Web Store for application access. Navigating to the Chrome Web Store and searching for “Zoom” will provide the necessary application for your Chromebook. Click “Add to Chrome” to begin the installation process. Once added, the Zoom icon will appear on your Chromebook’s desktop, ready for use.
Connecting Your Chromebook to a Zoom Meeting
Joining a Zoom meeting on your Chromebook is a simple process. Ensure you have a stable internet connection for a smooth experience. Open the Zoom application on your Chromebook. Click on “Join a Meeting,” and enter the meeting ID and password provided by the host. Your Chromebook will automatically detect your microphone and camera.
Using Your Chromebook’s Built-in Microphone and Camera
Your Chromebook typically includes a built-in microphone and camera, ready for use with Zoom. For optimal performance, ensure your microphone and camera are enabled in the Zoom settings. Adjust your microphone volume and camera settings for the best visual and audio clarity during the meeting. Position yourself in front of the camera to ensure clear visuals.
Importance of a Stable Internet Connection
A stable internet connection is crucial for a smooth Zoom experience on a Chromebook. Poor internet connectivity can lead to dropped calls, audio issues, or delayed video streaming. Test your internet speed before the meeting to ensure a reliable connection. Using Wi-Fi or a wired connection, rather than mobile data, is recommended for consistent connectivity.
Troubleshooting Zoom Setup on Chromebooks
| Technical Issue | Possible Solution |
|---|---|
| Zoom application not loading | Check your internet connection. Try clearing your browser’s cache and cookies. If the problem persists, restart your Chromebook. |
| Audio issues (e.g., no sound, echo) | Adjust microphone volume and settings in Zoom. Ensure the microphone is enabled. Check for background noise that might be interfering with the audio. |
| Video issues (e.g., blurry video, no video) | Ensure your Chromebook’s camera is enabled in Zoom settings. Adjust camera settings for better clarity. Check for obstructions that might be hindering the camera’s view. |
| Meeting connection issues (e.g., disconnections, buffering) | Check your internet connection for stability. Minimize other applications running on your Chromebook to free up resources. Try joining the meeting again. |
| Unable to find the Zoom app | Verify that you downloaded the Zoom application from the Chrome Web Store. If not found, download the app again. Check your Chrome Web Store downloads. |
Audio and Video Settings
Getting your audio and video just right for Zoom on your Chromebook is key to a smooth and productive meeting experience. Proper settings ensure everyone can hear and see you clearly, minimizing distractions and maximizing engagement. This section will guide you through adjusting these crucial components.Understanding how to fine-tune your audio and video settings is essential for a positive Zoom experience.
This involves managing microphone and speaker volume, testing your audio equipment, and optimizing video quality.
Adjusting Audio Settings
Proper audio settings ensure clear communication during your Zoom calls. Adjusting microphone volume and muting your microphone are essential for effective participation.
- Microphone Volume: Adjusting your microphone volume ensures your voice is heard clearly by others in the meeting. On your Chromebook, you can usually adjust the microphone volume using the system volume controls. This often involves navigating to the system tray or notification area at the bottom right of your screen. Look for an icon representing your microphone, and use the slider to control its volume.
- Muting Your Microphone: Muting your microphone prevents your voice from being heard during parts of the meeting where you don’t need to speak. This is critical for maintaining a quiet and focused environment for everyone. You can usually mute your microphone by clicking the microphone icon in the Zoom meeting controls. This action will visually indicate your microphone is muted.
Testing Audio Equipment
Testing your microphone and speakers before a Zoom call ensures optimal audio quality. This allows you to identify any potential issues beforehand.
- Microphone Test: Many Zoom clients have a built-in microphone test feature. Use this to verify your microphone is working correctly. If the test doesn’t work, it might indicate that your microphone isn’t recognized by your Chromebook or is malfunctioning. Checking for any software conflicts can help resolve this.
- Speaker Test: Zoom often provides a speaker test to confirm that your speakers are working and that the sound quality is adequate. Ensure you can hear the test tone clearly and without distortion. If there are issues, consider checking the speaker volume settings, and confirm your Chromebook’s audio output device is correctly selected.
Adjusting Video Settings
Optimizing video settings is crucial for a clear and engaging video presentation. Choosing appropriate settings can help maintain visual clarity and minimize any technical problems.
- Video Quality: Zoom allows you to adjust the quality of your video feed. Lower quality settings might save bandwidth, but could impact clarity. Higher quality settings provide better visuals, but might consume more bandwidth. Experiment with different settings to find the optimal balance between quality and bandwidth usage. On Chromebooks, the video quality settings may be part of the camera settings or the Zoom video settings.
Enabling/Disabling Webcam
Enabling or disabling your webcam during a Zoom meeting is straightforward. This allows you to control when your video is displayed.
- Enabling Webcam: To start displaying your video during a Zoom call, click the webcam icon in the Zoom controls. A live preview of your camera feed should appear.
- Disabling Webcam: To stop displaying your video feed, click the webcam icon again in the Zoom controls. Your video will be hidden from other participants.
Chromebook Video Capabilities Comparison
Different Chromebook models may vary in their video capabilities. This comparison helps understand the potential differences in video quality.
Figuring out Zoom on a Chromebook is surprisingly straightforward. You’ll want to make sure your Chromebook’s internet connection is solid, then download the Zoom app from the Chrome Web Store. While you’re at it, you might want to check out some great deals on tech like Apple M3 MacBook Pro, iMacs, and Sony InZone gaming headsets. There are some amazing deals currently available.
apple m3 macbook pro imac sony inzone gaming headset deal sale Once you’ve got the app installed, just follow the simple on-screen instructions to start a meeting or join one. Pretty easy, right?
| Chromebook Model | Camera Resolution | Video Frame Rate | Other Considerations |
|---|---|---|---|
| Example Model A | 720p | 30fps | May have additional processing limitations |
| Example Model B | 1080p | 60fps | Generally offers better video quality |
| Example Model C | 720p | 30fps | May have limitations depending on the specific hardware |
Note: The above table is a hypothetical example. Actual specifications vary significantly by model and manufacturer.
Screen Sharing and Presentation: How Use Zoom Chromebook
Sharing your Chromebook’s screen and presenting documents during a Zoom meeting is straightforward. This process allows you to effectively collaborate and share information with others in real-time. Understanding the various screen sharing options and annotation tools is key to making your Zoom experience more productive and engaging.
Sharing the Chromebook Screen
To share your Chromebook’s entire screen during a Zoom meeting, follow these steps:
- Click the “Share Screen” button in the Zoom meeting controls.
- Select the entire screen to share.
- Click “Share” to begin screen sharing.
This method is ideal for showcasing your entire desktop or demonstrating a process.
Presenting Documents, Spreadsheets, or Presentations
Sharing specific documents, spreadsheets, or presentations during a Zoom meeting involves selecting the appropriate application window.
- Open the document, spreadsheet, or presentation you wish to share.
- Click the “Share Screen” button in the Zoom meeting controls.
- Select the application window containing the document to share.
- Click “Share” to begin screen sharing.
This approach ensures that only the relevant content is visible to participants.
Using Annotation Tools
Zoom’s annotation tools enhance presentations. These tools allow for highlighting, drawing, and adding notes directly to the shared content.
Navigating Zoom on a Chromebook is surprisingly straightforward. Just download the Zoom app from the Chrome Web Store, and you’re good to go! But if you’re finding yourself needing to edit content for Facebook and Instagram, checking out the latest AI label updates on edited content might be helpful. facebook instagram ai label update edited content could impact how you share those Zoom meetings, so it’s worth a look if you’re working on visuals for your social media presence.
After all, a smooth Zoom experience is key, whether you’re just chatting or collaborating on a project.
- During a screen share, click the “Annotation” button.
- Select the desired annotation tool (e.g., highlighter, pen, or text box).
- Use the tool to add annotations to the shared document, spreadsheet, or presentation.
These tools are particularly helpful for emphasizing key points or providing real-time feedback during a presentation.
Screen Sharing Options
The following table Artikels different screen sharing options available in Zoom on a Chromebook.
| Option | Description |
|---|---|
| Entire Screen | Shares the entire Chromebook desktop. |
| Specific Application | Shares a particular application window. |
| Specific Window | Shares a single window within an application. |
Choosing the right option ensures that participants see only the necessary content.
Sharing Specific Applications or Windows, How use zoom chromebook
Sharing specific applications or windows is often more efficient than sharing the entire screen. This approach allows you to focus on the relevant information, thereby improving clarity and engagement.
- Identify the application or window you want to share.
- Click the “Share Screen” button in the Zoom meeting controls.
- Select the desired application or window.
- Click “Share” to begin screen sharing.
This targeted approach is particularly beneficial for presentations, tutorials, or demonstrations.
Managing Participants and Chat
Navigating Zoom meetings on a Chromebook involves specific interactions with participants and the chat function. Understanding these tools streamlines collaboration and ensures productive virtual sessions. This section delves into managing participants, using the chat, muting/unmuting, and file sharing within a Zoom meeting on your Chromebook.
Managing Participants
Effective management of participants is crucial for smooth meetings. Knowing how to control who speaks and interacts directly impacts the meeting’s efficiency. A well-managed meeting allows the host to maintain focus on the agenda and keep the discussion relevant.
- The host, on a Chromebook, can mute and unmute participants individually or in bulk. This capability ensures that disruptive elements do not hinder the flow of the discussion, and allows for focused attention on the speaker.
- The host can also grant or deny participants’ ability to share their video and/or audio. This allows for a controlled and organized environment, and prevents unexpected interruptions from audio or video issues.
- Removing a participant from the meeting can be necessary in certain circumstances. This action is typically reserved for instances where a participant is disrupting the meeting or has violated meeting etiquette.
Using the Chat Feature
The Zoom chat feature provides a vital communication channel for quick questions, announcements, and file sharing. Using the chat efficiently can greatly enhance a meeting’s effectiveness.
- The chat function on a Chromebook, like on other platforms, allows for text-based communication among participants. This is useful for exchanging quick messages, clarifying points, or asking questions.
- The chat window can be accessed and managed easily within the Zoom interface. Participants can type their messages directly into the chat box and send them to all participants or to specific individuals.
- The chat can also be used to share links to relevant documents, websites, or other resources. This is a very efficient method to provide supplementary information to participants.
Muting and Unmuting Participants
Muting and unmuting participants is a critical aspect of maintaining order and ensuring clear communication during Zoom meetings. A well-managed meeting environment helps everyone stay focused on the discussion at hand.
- To mute a participant, the host, using the Chromebook, can select the participant’s name and then choose the “mute” option from the menu. This option is often displayed as an icon (a microphone with a slash through it). This action silences the participant’s audio.
- Unmuting a participant is just as straightforward. The host can select the participant’s name and choose the “unmute” option from the menu. This option is often displayed as an icon (an audio speaker).
- The host can mute or unmute all participants at once using the appropriate button in the participant list. This is particularly useful in large meetings or when there’s a sudden need to silence all participants.
Sharing Files or Documents
Sharing files or documents during a Zoom meeting can be a very helpful tool for collaboration. The method of file sharing allows participants to view and interact with shared content.
- To share files or documents, the host can use the built-in file-sharing feature of Zoom. This can involve selecting the desired file or document from the user’s device.
- Once selected, the host can share the document, which then appears on all participants’ screens. This enables participants to view the document or file.
- The method for sharing files or documents might vary depending on the specific Chromebook’s operating system and the version of Zoom being used. This may involve using the “Share Screen” function and selecting the appropriate file.
Summary of Participant Interaction
| Interaction | Action | Description |
|---|---|---|
| Mute/Unmute | Host Action | Control participant audio. |
| Grant/Deny Audio/Video | Host Action | Control participant audio/video. |
| Remove Participant | Host Action | Remove participant from meeting. |
| Chat | Participant/Host | Text-based communication. |
| File Sharing | Host Action | Share documents/files. |
Troubleshooting Common Issues
Using Zoom on a Chromebook can sometimes present unexpected challenges. This section details common technical issues and provides step-by-step solutions to help you overcome them. Understanding these issues and their resolutions will ensure a smoother and more reliable Zoom experience.
Common Zoom Connectivity Problems on Chromebooks
Zoom connectivity problems can stem from various factors, including network instability, software conflicts, or outdated configurations. Identifying the root cause is crucial for effective troubleshooting.
Figuring out how to use Zoom on a Chromebook is pretty straightforward. You’ll want to check out the official Zoom help pages for detailed instructions, but basically, you download the app and follow the prompts. Speaking of tech, did you know the Polestar 3 electric SUV has a killer range and a sleek design? polestar 3 electric suv ev range price specs are a must-read if you’re in the market for an EV.
Once you’ve got Zoom working on your Chromebook, you can easily schedule meetings and join calls with ease.
- Poor Internet Connection: A weak or unstable internet connection is a frequent culprit for Zoom issues. Verify your internet speed and stability. If possible, connect to a different network or try connecting with a wired connection. If the problem persists, consult your internet service provider for assistance.
- Browser Issues: Chromebooks often rely on the Chrome browser for Zoom. Ensure the browser is updated to the latest version. Clear browser cache and cookies, and try using a different browser if possible to rule out any browser-specific conflicts.
- Zoom App Problems: Zoom software itself may encounter glitches. Check for updates to the Zoom app. Sometimes, restarting the Zoom application or clearing the Zoom app cache can resolve minor glitches. If the issue persists, consider restarting the Chromebook.
Troubleshooting Audio and Video Problems
Audio and video issues during Zoom calls can be frustrating. Several factors, such as microphone or camera settings, can lead to these problems.
- Microphone Issues: If your microphone isn’t working, verify it’s enabled in the Chromebook’s settings. Ensure the microphone is not muted in the Zoom application itself. Test the microphone with a different application or by calling another person to rule out microphone hardware problems.
- Camera Issues: If your camera is not working, verify it’s enabled and selected in the Zoom settings. Check the camera’s settings on your Chromebook. Try using a different camera if possible to determine if the issue is with the camera itself.
- Video Quality Issues: Low video quality can be caused by a poor internet connection or by the camera itself. Adjust video settings in Zoom and in your Chromebook’s camera settings. Ensure your camera’s resolution is appropriate for your internet speed. Test your video quality with another application.
Zoom Error Codes and Solutions
A table outlining common error codes and their corresponding solutions can be immensely helpful for quickly identifying and resolving issues.
| Error Code | Possible Cause | Solution |
|---|---|---|
| Zoom Error 100 | Network connectivity problems | Check internet connection, restart router/modem, try a different network. |
| Zoom Error 101 | Microphone or camera not enabled/selected | Ensure the microphone and camera are enabled in Zoom settings and Chromebook settings. |
| Zoom Error 200 | Zoom application issues | Update Zoom app, restart the Zoom app, restart the Chromebook. |
Accessing Zoom Help Center for Chromebook Issues
Zoom provides extensive resources in their help center. The Zoom help center offers comprehensive guides and articles specifically tailored to Chromebook users. Search the Zoom help center using s related to your Chromebook issue. For example, searching “Zoom Chromebook microphone not working” will likely yield relevant solutions.
Preventing Common Zoom Problems on Chromebooks
Several preventive measures can minimize the likelihood of Zoom problems.
- Keeping Software Updated: Regularly update your Chromebook’s operating system, Chrome browser, and Zoom application to patch potential vulnerabilities and ensure compatibility.
- Testing Connections: Before a Zoom meeting, test your internet connection and microphone/camera to avoid unexpected issues during the meeting.
- Using a Stable Network: Connect to a reliable and stable Wi-Fi network or use a wired connection for optimal performance during Zoom calls.

Security Considerations
Zoom meetings, even on Chromebooks, can be vulnerable to security breaches if precautions aren’t taken. Understanding the potential risks and implementing robust security measures is crucial to protect your data and privacy. This section delves into the security considerations specific to using Zoom on a Chromebook, providing practical steps to enhance your meeting’s safety.Using Zoom on a Chromebook, like any online platform, requires a proactive approach to security.
Failing to implement appropriate security measures can expose you to unauthorized access, data breaches, and potential privacy violations. By understanding and addressing these security concerns, you can create a safer and more secure environment for your Zoom meetings.
Protecting Your Chromebook from Unauthorized Access
Ensuring your Chromebook is secure before and during a Zoom meeting is paramount. This involves safeguarding against unauthorized access to your device and preventing malicious activities. The following steps are critical for protecting your Chromebook from unauthorized access during a Zoom meeting.
- Strong Passwords and Multi-Factor Authentication (MFA): Using a strong, unique password for your Chromebook and enabling MFA whenever possible adds an extra layer of security. This prevents unauthorized access even if someone gains access to your password.
- Regular Software Updates: Keeping your Chromebook’s operating system and Zoom application up-to-date is essential. Updates often include crucial security patches that address vulnerabilities.
- Firewall Configuration: Activating your Chromebook’s built-in firewall is a simple but effective measure. It blocks unauthorized network connections, helping prevent malicious actors from gaining access.
- Public Wi-Fi Caution: Avoid using public Wi-Fi networks for sensitive activities like Zoom meetings, especially if the network isn’t secure. Use a secure and trusted private network whenever possible.
Securing Your Zoom Meetings
Securing your Zoom meetings on a Chromebook involves a combination of user-level and meeting-level precautions. By implementing the best practices below, you can significantly improve the security of your online sessions.
- Meeting Passwords: Use a strong, unique password for each Zoom meeting to restrict access to authorized participants only. Avoid using easily guessable or previously used passwords.
- Host Controls: Familiarize yourself with the host controls in Zoom. They allow you to mute participants, prevent screen sharing, and manage other features to maintain control over the meeting environment.
- Disable Waiting Room (Consideration): While a waiting room can prevent unwanted guests, it might also delay authorized participants. Carefully consider the trade-offs when deciding whether to use a waiting room.
- Meeting Encryption: Zoom supports encryption, which protects the data transmitted during the meeting. Ensure encryption is enabled for added security.
- Virtual Backgrounds: Be mindful of the information that might be visible in your virtual background. Avoid using backgrounds that reveal sensitive information or personal details.
Potential Security Risks
Several potential security risks can affect Zoom meetings on Chromebooks. Understanding these risks helps you proactively implement safeguards.
- Phishing Attacks: Be wary of phishing attempts that may trick you into revealing login credentials or other sensitive information.
- Malware Infections: Ensure your Chromebook is free from malware. Malicious software could compromise your device and potentially intercept information during Zoom meetings.
- Man-in-the-Middle Attacks: Be aware of potential man-in-the-middle attacks, where an attacker intercepts communication between your Chromebook and the Zoom server. Use secure connections to mitigate this risk.
- Data Breaches: Zoom, like other online platforms, is susceptible to data breaches. Adhere to security protocols to minimize your risk.
Best Practices for Secure Zoom Meetings
Implementing the following best practices can enhance the security of your Zoom meetings on a Chromebook.
- Review Zoom’s Security Guidelines: Staying updated on Zoom’s security guidelines and recommendations is essential for maintaining a secure environment.
- Regular Security Audits: Conduct periodic security audits to identify potential vulnerabilities in your Zoom setup.
- Choose a Reliable Internet Connection: Use a stable and reliable internet connection to avoid disruptions during the meeting.
- Employ Strong Password Management Practices: Use strong, unique passwords and enable two-factor authentication wherever possible to protect your accounts.
Alternative Applications (Optional)
Beyond Zoom, a plethora of video conferencing tools are compatible with Chromebooks, each with its own strengths and weaknesses. Choosing the right alternative depends on specific needs and preferences, from simple group chats to complex presentations. Understanding the features and limitations of these applications can empower users to select the best tool for their specific use case.Choosing a video conferencing tool beyond Zoom often involves balancing features, ease of use, and potential compatibility issues on Chromebooks.
Consider the frequency of use, the number of participants, and the required functionalities when making your decision.
Comparison of Video Conferencing Applications
Various video conferencing applications cater to different user needs. This section provides a comparative overview of popular choices.
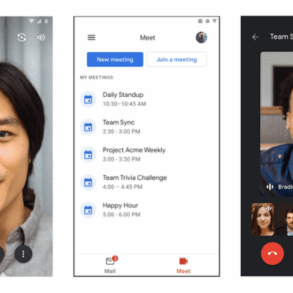
- Google Meet: Google Meet is an integrated solution within the Google Workspace suite. Its seamless integration with other Google services, such as Gmail and Google Drive, makes it a strong contender. Ease of use and familiarity for users already within the Google ecosystem are key advantages. However, features might not be as extensive as those offered by dedicated third-party applications.
- Microsoft Teams: Teams is a robust platform often preferred for business environments. Its strong collaboration features and integration with Microsoft 365 products provide a comprehensive solution. However, the learning curve might be steeper for users not already familiar with the Microsoft ecosystem, and the interface may not be as intuitive as other applications for individuals or small groups.
- Jitsi Meet: Jitsi Meet is a free and open-source platform known for its simplicity and security. Its emphasis on security and privacy makes it an appealing choice for individuals and organizations prioritizing these aspects. While Jitsi offers basic features, it might lack the advanced functionalities present in commercial alternatives.
- Skype: Skype remains a popular choice for personal communication. Its ease of use and familiarity for personal communication make it a viable option. However, its feature set might be limited for more complex collaborative needs compared to dedicated conferencing platforms.
Zoom vs. Alternative Applications on Chromebooks
Comparing Zoom with other applications involves evaluating several key factors. The user experience, features, and overall performance can differ based on the chosen platform.
- Zoom’s strengths on Chromebooks often lie in its widespread adoption, which means most users will find the software and any necessary extensions readily available. Its comprehensive feature set is also a plus, especially for complex presentations and meetings. However, the potential for compatibility issues with certain Chromebook models or browser extensions can’t be ignored.
- Alternatives like Google Meet often seamlessly integrate with other Google services, offering a streamlined experience for those already within the Google ecosystem. This ease of use can be a significant advantage. However, specialized features or advanced functionalities found in dedicated conferencing platforms might not be readily available in Google Meet.
Availability of Extensions/Plugins
Extensions and plugins can enhance Zoom’s functionality on Chromebooks. These additions can improve usability or add new features, although they might introduce compatibility issues or performance bottlenecks.
- Many Chrome extensions exist to enhance Zoom, such as those adding screen sharing options or managing participant controls. However, careful consideration of the extension’s reliability and compatibility with the Chromebook model is crucial.
Summary Table of Video Conferencing Applications
The following table summarizes the key features of several popular video conferencing applications compatible with Chromebooks. This table provides a quick reference for comparing various options.
| Application | Ease of Use | Features | Integration | Security |
|---|---|---|---|---|
| Zoom | Generally good | Extensive | Moderate | Good |
| Google Meet | Excellent (Google Ecosystem) | Solid | Excellent (Google Ecosystem) | Good |
| Microsoft Teams | Good (with prior experience) | Comprehensive | Excellent (Microsoft Ecosystem) | Good |
| Jitsi Meet | Simple | Basic | Limited | Excellent |
| Skype | Very Easy | Limited | Limited | Moderate |
Usability Differences on Chromebooks
The usability of each application on Chromebooks can vary significantly. Factors like interface design, available extensions, and integration with Chromebook features play a crucial role in the user experience.
Final Wrap-Up
This guide has equipped you with the knowledge to navigate Zoom on your Chromebook with confidence. We’ve covered the essentials, from initial setup to advanced features, and included practical troubleshooting advice. Now you can confidently participate in meetings, share your screen, and connect with others, all from the convenience of your Chromebook.