


How to make a cheap simple lawn sprinkler system? This guide walks you through creating a functional and affordable irrigation solution for your lawn. We’ll cover everything from planning your system to choosing budget-friendly materials and conserving water. Discover the benefits of a DIY sprinkler system, compared to professional installation, and learn how to avoid common pitfalls.
From designing your layout to troubleshooting potential issues, we’ll equip you with the knowledge to build a system tailored to your specific needs.
A DIY sprinkler system offers significant cost savings compared to hiring a professional. This guide will walk you through each step of the process, from initial planning to final installation. You’ll learn to calculate water needs, select appropriate sprinkler heads, and connect components effectively. The step-by-step instructions will help you create a system that efficiently waters your lawn without breaking the bank.
Introduction to DIY Sprinkler Systems

Building a DIY sprinkler system can save you a significant amount of money compared to hiring a professional. It’s a rewarding project that allows you to customize your watering schedule and ensure efficient water usage for your lawn. This approach provides valuable hands-on experience in plumbing and landscaping, which can be highly beneficial in the long run.DIY sprinkler systems offer flexibility in design and placement, tailoring the watering pattern to your specific yard layout.
This is particularly useful for irregular shaped gardens, slopes, or areas with unique landscaping features. The key to a successful DIY system lies in understanding the different types of systems available and choosing the right tools and materials.
DIY Sprinkler System Types
Different types of DIY sprinkler systems cater to various needs and lawn characteristics. Understanding the options allows for informed choices, maximizing efficiency and cost-effectiveness. Soaker hoses, drip irrigation, and oscillating sprinklers are common DIY choices, each with its own set of advantages and disadvantages.
Comparison of DIY and Professional Installation Costs
DIY sprinkler systems often prove significantly more affordable than professionally installed ones. Labor costs, design fees, and travel expenses are all factored into professional installations. While upfront costs for DIY might seem similar to those for some simple professional installations, the long-term savings can be substantial. For example, a basic DIY system could save you hundreds of dollars compared to a professionally installed one, with the same or better performance.
Essential Tools and Materials
A basic DIY sprinkler system requires a few key tools and materials. A basic set of hand tools, including shovels, wrenches, and screwdrivers, is usually sufficient. Additionally, you’ll need PVC pipes, connectors, sprinkler heads, and soaker hoses or drip irrigation components. The specific materials needed will depend on the chosen system type.
Pros and Cons of Different DIY Sprinkler System Types
| Sprinkler System Type | Pros | Cons |
|---|---|---|
| Drip Irrigation | Efficient water usage, targeted watering, reduces weed growth, suitable for specific plants, minimizes water waste. | Installation can be complex, requires careful planning, more expensive initial investment for materials, less suitable for larger areas. |
| Soaker Hoses | Easy to install, relatively inexpensive, covers a large area, good for even watering, easy to maintain, flexible to adapt to irregular landscapes. | Less precise watering, can be less efficient for large lawns or slopes, water can run off if not properly laid, prone to clogging if not cleaned regularly. |
| Oscillating Sprinklers | Covers a wide area, relatively easy to install, affordable, simple to use. | Less efficient water usage, can overwater some areas, less precise, not suitable for all lawn types or specific plants, may not be ideal for large lawns. |
Planning Your Sprinkler System
Designing a DIY sprinkler system involves careful planning to ensure efficient water usage and optimal lawn health. Understanding your lawn’s specific needs and selecting the right equipment are crucial for a successful installation. This section guides you through the key steps of planning your system.A well-planned sprinkler system saves you money on water bills and ensures your lawn receives the precise amount of water it needs, promoting healthy growth and reducing water waste.
Determining Water Needs
Knowing how much water your lawn needs is essential for choosing the right sprinkler system. Factors like the type of grass, climate, and soil conditions influence watering requirements. A simple way to estimate is by observing how long it takes for your lawn to dry after a rain. Observe your lawn’s dryness pattern to understand its water retention.
A lawn that dries quickly might need more frequent watering compared to one that retains water longer. Local water conservation guidelines can also provide useful recommendations specific to your area.
Calculating Lawn Area
Accurately calculating the area of your lawn to be watered is crucial for determining the appropriate sprinkler system components. This process involves measuring the length and width of the area. For rectangular lawns, simply multiply the length by the width. For irregular shapes, divide the lawn into smaller, regular shapes (rectangles or triangles) and calculate the area of each.
Sum the areas of all the shapes to get the total lawn area. For example, a lawn measuring 20 feet by 30 feet has an area of 600 square feet. Tools like measuring tapes and a calculator can assist in the calculation.
Influencing Factors in Sprinkler Placement
Sprinkler placement is crucial for even water distribution. Consider the slope of your lawn. Water tends to pool in low areas. Sprinklers should be strategically placed to avoid these areas and ensure even watering across the entire lawn. The type of plants in your lawn also influences sprinkler placement.
Some plants require more water than others. If you have a variety of plants, it’s essential to place sprinklers to avoid overwatering some and underwatering others. For example, a flowerbed might require a different sprinkler pattern than the surrounding lawn. Careful consideration of these factors ensures your sprinkler system meets the needs of your entire landscape.
Selecting Sprinkler Heads, How to make a cheap simple lawn sprinkler system
The right sprinkler head is crucial for consistent water coverage and avoiding overspray. Factors like lawn size, desired watering pattern, and the types of plants to be watered should be considered when selecting sprinkler heads. For example, a lawn with trees or shrubs might require a different sprinkler head than a completely flat lawn.
Sprinkler Head Suitability Table
| Sprinkler Head Type | Suitable Lawn Size (approx.) | Watering Pattern | Advantages | Disadvantages |
|---|---|---|---|---|
| Oscillating Sprinklers | Small to Medium | Wide, sweeping pattern | Affordable, easy to install | Can overspray, uneven coverage on sloped lawns |
| Rotating Sprinklers | Medium to Large | Circular pattern | Even water distribution, suitable for larger areas | Can be more expensive, potential for overspray |
| Spray/Mist Nozzles | Small to Medium | Fine spray, suitable for shrubs and flowers | Precise water application, reduces overspray | Might not cover large areas efficiently, potentially higher initial cost |
| Drip Irrigation Systems | Small to Medium, ideal for gardens/shrubs | Targeted water delivery | Highly efficient, reduces water waste, excellent for specific plant needs | Installation can be more complex, potentially higher initial cost |
Assembling the Sprinkler System Components: How To Make A Cheap Simple Lawn Sprinkler System
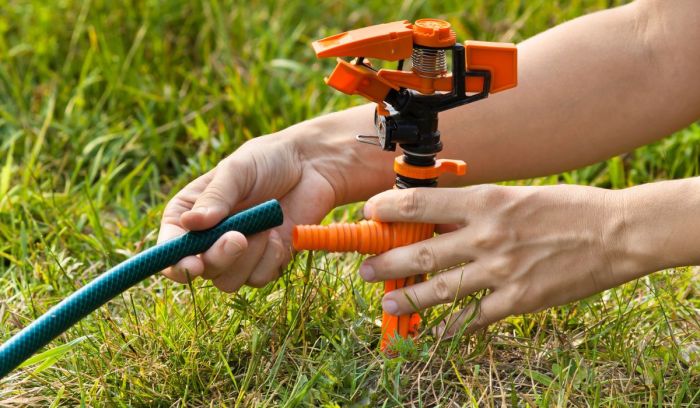
Bringing your DIY sprinkler system to life involves meticulously connecting various components. This stage requires careful attention to detail to ensure proper water flow and efficient coverage. Understanding the connections between the water supply, sprinkler heads, and valves is crucial for a successful installation. Follow these steps to create a functional and reliable system.
Connecting Water Supply Lines
Properly connecting the water supply lines to your sprinkler system is paramount for efficient water delivery. First, identify the appropriate water supply valve. Ensure the valve is compatible with the sprinkler system’s water pressure and flow rate. Then, carefully attach the water supply line to the valve, using appropriate connectors. Use Teflon tape or pipe sealant to prevent leaks and ensure a secure connection.
This step requires precision to avoid potential water waste and damage to your system.
Installing Sprinkler Heads and Valves
Installing sprinkler heads and valves involves several steps. First, choose the appropriate sprinkler heads for your lawn’s layout and desired coverage patterns. Determine the spacing and direction of the heads based on your yard’s design. Then, carefully attach the sprinkler heads to the corresponding pipes, ensuring the connections are tight and leak-proof. Likewise, carefully connect the valves to the pipes, following the manufacturer’s instructions.
Proper valve placement is crucial for controlling water flow to individual zones of the sprinkler system.
Ever wanted a killer lawn sprinkler system without breaking the bank? It’s surprisingly easy! You can DIY a simple, effective system using PVC pipes, some inexpensive valves, and a timer. Speaking of budget-friendly projects, did you know that the latest news on the SAG strike podcast, along with insights into the iHeart Radio, Obama, and Grammys, and YouTube, are all trending topics?
sag strike podcast iheart obama grammys youtube Getting your lawn looking lush and green doesn’t have to be complicated. Just a little ingenuity, and you’ll have a watering system that works wonders.
Tips for Avoiding Common Mistakes
Several factors can lead to problems in your sprinkler system installation. Firstly, ensure all connections are leak-proof. Using appropriate pipe sealant or Teflon tape is vital. Secondly, consider the water pressure of your supply. Using heads and valves not suitable for the pressure can cause issues.
Thirdly, verify that all sprinkler heads are facing the intended direction. Improper direction can lead to uneven watering. Lastly, remember to properly label each valve and zone for easy identification and maintenance.
Creating Custom Sprinkler Layouts
Designing a custom sprinkler layout requires careful planning. Consider the shape and size of your lawn, as well as any obstacles or features. Use a garden hose or spray bottle to Artikel the area each sprinkler head will cover. Map out the placement of each sprinkler head, considering the desired watering pattern and coverage area. The layout should be designed to efficiently and effectively water the entire lawn without overwatering any specific area.
Consider using a blueprint or diagram to visualize the entire system before starting installation.
Connecting Sprinkler Components
Connecting various sprinkler components requires precision and attention to detail. A diagram can be a valuable tool in this process. For example, to connect a valve to a pipe, ensure that the valve is properly sized for the pipe. Using appropriate connectors and sealant will prevent leaks. Similarly, connecting multiple sprinkler heads to a single pipe will involve using appropriate couplings or connectors.
Connecting the water supply to the main valve requires ensuring the appropriate fittings are used. Careful consideration and adherence to manufacturer instructions will lead to successful connections and prevent complications.
| Component | Connection Method | Diagram |
|---|---|---|
| Valve | Connect to pipe using appropriate connectors | (Imagine a diagram here showing a valve connected to a pipe) |
| Sprinkler Head | Connect to pipe using appropriate couplings or connectors | (Imagine a diagram here showing a sprinkler head connected to a pipe) |
| Water Supply | Connect to main valve using appropriate fittings | (Imagine a diagram here showing the water supply connected to the main valve) |
Proper connection methods and the use of appropriate sealant are crucial for a leak-free and efficient system.
Budget-Friendly Materials and Supplies
Saving money is crucial when building a DIY sprinkler system. This section explores cost-effective alternatives for materials, comparing prices from different retailers, and highlighting budget-friendly options from DIY stores. We’ll also examine the pros and cons of using recycled materials, providing a balanced perspective on maximizing your savings without compromising quality.Finding the right materials for your DIY sprinkler system doesn’t have to break the bank.
Careful selection and smart sourcing can significantly reduce costs without sacrificing the effectiveness of your system. This section will equip you with the knowledge to make informed decisions, ultimately leading to a cost-effective and efficient watering solution for your lawn.
Cost-Effective Alternatives for PVC Pipes
PVC pipes are a common choice for sprinkler systems, but alternatives exist. Consider using schedule 40 PVC pipes for general use. They offer a balance of cost-effectiveness and durability. Alternatively, schedule 80 PVC pipes, while slightly more expensive, provide greater strength and can withstand higher pressures, making them a worthwhile investment for large or complex systems. Polyethylene (PE) pipes are also a viable option.
They are lightweight and flexible, which is helpful for installation in challenging terrains. However, they might be less durable than PVC for extensive systems.
Comparing Prices of Materials from Different Retailers
Comparing prices across various retailers is crucial for optimizing your budget. Home improvement stores like Home Depot, Lowe’s, and Menards often offer competitive pricing on PVC pipes, sprinkler heads, and other components. Online retailers can also provide attractive deals and discounts, particularly for bulk purchases. Comparing prices from different suppliers is essential to finding the best value for your specific needs.
Consider factors such as shipping costs and potential bulk discounts when making your selection.
DIY Stores Offering Affordable Supplies
Numerous DIY stores specialize in providing affordable materials for home improvement projects. Local hardware stores, independent suppliers, and even online marketplaces can offer competitive pricing on specific materials, often with personalized customer service. These stores can be a valuable resource for acquiring components for your sprinkler system. They frequently have more specialized products or can provide better pricing on specific materials.
Advantages and Disadvantages of Using Recycled Materials
Using recycled materials for your sprinkler system can be a cost-effective and environmentally friendly choice. Old PVC pipes, for instance, can be repurposed for smaller-scale projects, and recycled sprinkler heads are an option if their functionality isn’t compromised. However, ensuring the quality and structural integrity of recycled materials is essential to prevent potential issues with leaks or system malfunctions.
The longevity of the recycled materials should also be taken into consideration.
Table Comparing Prices of Materials from Different Suppliers
| Material | Supplier 1 (Example) | Supplier 2 (Example) | Supplier 3 (Example) |
|---|---|---|---|
| Schedule 40 PVC Pipe (10 ft) | $5.99 | $6.49 | $5.50 |
| Sprinkler Head (Spray Pattern) | $7.99 | $8.49 | $7.25 |
| Elbows (90°) | $2.50/ea | $2.75/ea | $2.25/ea |
| Connectors | $1.99/ea | $2.19/ea | $1.75/ea |
Note: Prices are approximate and may vary based on quantity, location, and specific product models.
Water Conservation Techniques for DIY Sprinkler Systems
Saving water is crucial for both environmental sustainability and budget-friendliness, especially when you’re building your own sprinkler system. A well-designed DIY system can significantly reduce water waste compared to traditional methods, and this guide will show you how. Proper water management is vital for a thriving lawn and reduced water bills.Efficient watering techniques go beyond simply turning the sprinklers on; they involve careful planning and execution.
Understanding how to distribute water evenly and schedule watering optimally is key to maximizing your DIY system’s effectiveness while minimizing environmental impact. This section explores essential water conservation strategies for DIY sprinkler systems.
Even Water Distribution
Ensuring even water distribution across your lawn is essential for healthy grass growth and prevents waterlogging in some areas while others remain dry. Improper distribution leads to wasted water and unevenly watered lawns. A consistent water application across the entire area is paramount.
- Proper sprinkler head selection: Different sprinkler heads are designed for various coverage patterns. Choose heads that effectively cover the area without overlapping or leaving gaps. Consider the size and shape of your lawn when making this selection. For instance, rotary sprinklers are suitable for larger areas, while spray sprinklers work well for smaller areas. Proper placement of sprinklers also affects coverage, so careful planning is key.
- Leveling the lawn: Uneven terrain can cause some areas to receive more water than others. A level lawn ensures consistent water distribution. Consider using landscaping techniques to create a level playing field for your sprinkler system.
- Adjusting sprinkler pressure: The pressure of the water affects the range and intensity of the sprinkler’s spray. Lower pressure can lead to more concentrated water delivery, allowing for more targeted watering. High pressure, however, can lead to wider coverage but could lead to uneven water distribution. Adjusting the sprinkler heads can improve efficiency.
Scheduling Watering Times
Watering during the optimal time of day minimizes evaporation and maximizes water absorption by the lawn. Watering at the wrong time can lead to water loss due to evaporation, and can lead to issues with fungal growth. Understanding when to water is as important as how to water.
- Early morning watering: Watering early in the morning, ideally before 10 AM, allows the water to soak into the ground before the sun’s heat causes significant evaporation. This also reduces the risk of algae and fungus growth on the grass.
- Consider weather conditions: Rainy days, or when the weather forecast predicts rain, should avoid watering. Watering when the ground is already wet is a waste of water. Use weather forecasts and local conditions to guide your watering schedule.
- Using a timer: Installing a programmable timer ensures consistent watering schedules, preventing overwatering or underwatering. This automation ensures your lawn receives the right amount of water, at the right time.
Smart Controllers for Water Conservation
Smart controllers offer advanced features that can help save water and optimize watering routines. These controllers are equipped with sensors and software that can adapt to your lawn’s specific needs.
- Automated adjustments: Smart controllers use weather data to automatically adjust watering schedules. They can account for rainfall, temperature, and humidity, which can reduce water waste.
- Soil moisture sensors: These sensors monitor the moisture level of the soil. The system automatically adjusts watering based on real-time soil moisture levels, ensuring the lawn receives only the water it needs. This prevents overwatering in dry soil, and prevents watering in already wet soil.
- Remote control and monitoring: Many smart controllers offer remote access, allowing you to monitor and adjust watering schedules from anywhere. This provides a degree of flexibility and control over your watering routine.
Optimizing Sprinkler System Efficiency
Optimizing your sprinkler system for efficiency involves several key aspects that improve the entire process, and improve the effectiveness of your water conservation strategies. Regular maintenance and careful planning are key to success.
- Regular maintenance: Regularly check for leaks and clogs in the sprinkler system. Fixing any leaks or blockages prevents unnecessary water loss and ensures the system works effectively. Inspect the sprinkler heads and nozzles to identify and address any damage or obstructions that can impair their functionality.
- Adjusting sprinkler head placement: If needed, adjust the sprinkler heads’ positions to improve coverage and reduce water waste. Ensure that the heads are directed at the area that needs watering and are not spraying water on surfaces that don’t need it.
- Using appropriate nozzle settings: Different nozzle settings are designed for various water pressure levels and watering needs. Use the appropriate nozzle settings for your system to optimize water delivery and avoid unnecessary water usage. Consider the size of your lawn and the desired watering intensity.
Troubleshooting and Maintenance
A DIY sprinkler system, while budget-friendly, requires proactive maintenance to ensure efficient water distribution and a long lifespan. Ignoring potential issues can lead to wasted water, uneven watering, and costly repairs down the road. Understanding common problems and preventative measures is key to maximizing your system’s effectiveness.Troubleshooting and regular maintenance are essential for a functioning and cost-effective DIY sprinkler system.
Ever wanted a simple, affordable lawn sprinkler system? It’s surprisingly easy to DIY! Plus, with a little extra investment, you can feel safer with these smart home security gadgets, like smart cameras and motion detectors. They’ll keep an eye on things while you’re away, allowing you to relax and enjoy your well-watered lawn. Just a few simple parts and some elbow grease, and you’ll have a beautiful, watered lawn without breaking the bank.
Early detection and resolution of issues will prevent minor problems from escalating into major ones. Proactive maintenance not only saves money but also ensures your lawn receives the consistent watering it needs.
Ever wanted a simple, budget-friendly sprinkler system for your lawn? It’s surprisingly easy to DIY! You can find tons of helpful tutorials online, and a quick search will reveal innovative ways to reuse old PVC pipes and other materials. While we’re on the topic of innovation, did you know that a Waymo loyalty program could be in the works?
a waymo loyalty program could be in the works This could offer exclusive benefits for Waymo users. Regardless of future tech developments, a simple DIY sprinkler system will always be a worthwhile project for keeping your lawn looking great.
Identifying Potential Issues
Common problems in DIY sprinkler systems include leaks, clogs, and malfunctioning valves. Leaks can be subtle, causing significant water waste over time. Clogs can disrupt water flow, leading to uneven watering and potentially damaging the system. Malfunctioning valves can lead to inconsistent or no water delivery to certain areas. A thorough understanding of the system’s components and how they work is essential to identify and resolve these issues effectively.
Troubleshooting Common Problems
- Leaks: Visual inspections are crucial. Check all connections, pipes, and sprinkler heads regularly for any signs of moisture. Use a spray bottle of soapy water to identify areas where water is seeping. Repair or replace damaged parts immediately to prevent further water loss.
- Clogs: Clogs often result from debris, such as leaves, twigs, or soil particles, accumulating in the pipes or sprinkler heads. Regular cleaning of the system, including the sprinkler heads, will help maintain proper water flow. If clogs persist, try using a garden hose with a nozzle to flush the lines. Consider using a chemical cleaner (approved for your system) for stubborn clogs.
- Malfunctioning Valves: Check if valves are fully opening and closing. A simple visual inspection can identify if a valve is stuck or not functioning correctly. If the valve isn’t working properly, consult a plumbing guide to address any possible problems.
Maintaining Your System
Regular checks and maintenance are vital to prolong the lifespan of your DIY sprinkler system. This involves inspecting all components for wear and tear, clearing blockages, and ensuring proper functionality. This prevents minor issues from escalating into major problems.
Preventing Clogs and Blockages
Preventing clogs is a crucial aspect of system maintenance. Regularly flushing the system with water can remove debris before it accumulates. Consider using a fine-mesh strainer in the water intake line to catch larger particles. Install a backflow preventer to avoid debris from entering the system from the water source.
Regular Checks and Maintenance Procedure
A detailed procedure for regular maintenance is essential for a long-lasting and reliable sprinkler system. Establish a schedule for inspecting all components (valves, pipes, sprinkler heads) and connections, clearing debris, and checking for leaks. A simple checklist can aid in keeping track of maintenance tasks and ensuring nothing is overlooked. Use a pressure gauge to verify water pressure and ensure it is within the system’s specifications.
Visual Representation of the Sprinkler System
Bringing your DIY sprinkler system to life involves more than just gathering parts; it’s about visualizing the flow and placement. A clear diagram is crucial for a successful installation, allowing you to anticipate potential issues and ensure even water distribution across your lawn. This visual guide will help you conceptualize your system’s layout, water flow, and different sprinkler head options.A well-planned sprinkler system not only saves water but also ensures your lawn gets the hydration it needs.
This detailed illustration will cover essential aspects, from connecting the water source to choosing the right sprinkler heads, enabling you to craft a customized and effective system for your specific yard.
Complete DIY Sprinkler System Layout
This diagram illustrates a basic, yet effective, DIY sprinkler system. The system’s simplicity is key to its affordability and ease of installation. Note that the specific components and layout can be adapted to your lawn’s shape and size. 
Water Flow and Components
The water source (e.g., a hose bib or outdoor faucet) is the initial point for water flow. PVC pipes distribute water to different zones or sections of the lawn. Each section has its own sprinkler head, and valves control the water flow to each zone. This modular approach allows for individual adjustments and ensures you don’t overwater one part of the lawn while another area remains dry.
Sprinkler Head Types and Coverage
Different sprinkler heads offer various spray patterns and coverage areas. A thorough understanding of these differences is essential for even watering.
- Oscillating heads: These heads move back and forth, providing coverage in a wide arc. Ideal for larger areas.
- Rotating heads: These heads rotate, covering a circular area. Good for specific areas and precise watering.
- Spray heads: These heads spray water in a gentle, wide pattern. Useful for flower beds or areas needing a gentler watering approach.
Selecting the appropriate sprinkler head type depends on the specific watering needs of your lawn and the shape of the area being watered.
Connecting to the Water Source
A crucial step is connecting the sprinkler system to the water source. This usually involves a hose bib or outdoor faucet. A simple PVC pipe, fitted with appropriate connectors, carries water from the source to the main sprinkler lines.
Layout Options for Different Lawn Shapes
The system’s design adapts to different lawn shapes. A simple layout can be sufficient for rectangular lawns. For irregularly shaped lawns, multiple zones, and valves are necessary to provide proper coverage.
| Lawn Shape | Layout Description |
|---|---|
| Rectangular | A single main line running the length of the lawn, with sprinkler heads positioned along the line. |
| Irregular | Multiple zones with separate valves and lines to accommodate different parts of the lawn. This ensures specific areas receive the appropriate amount of water. |
Final Conclusion
In conclusion, creating a cheap and simple lawn sprinkler system is achievable with careful planning and execution. This guide provided a comprehensive overview of the process, from initial planning to troubleshooting. Remember to prioritize water conservation, using efficient sprinkler heads and smart controllers. By following the steps Artikeld, you can successfully build a custom sprinkler system that meets your needs and budget.
Happy watering!