


Valve Steam Deck Teardown Repair Open: This guide takes you inside the Steam Deck, revealing the intricate mechanisms and potential repair areas. We’ll explore common issues and failures, from component breakdowns to potential valve malfunctions. Learn the essential safety precautions, and follow step-by-step instructions for a safe and effective teardown and repair. Get ready to understand the inner workings of your Steam Deck like never before.
The Steam Deck, a portable powerhouse, offers incredible gaming and productivity experiences. However, like any complex device, it can encounter problems. This guide is designed to help you understand and address issues related to the valve, offering insights into safe and effective repair procedures, covering everything from diagnostics to advanced modifications. We’ll walk you through the entire process, ensuring you have the knowledge and confidence to tackle repairs effectively.
Introduction to Steam Deck Valve Teardown and Repair
The Valve Steam Deck, a portable gaming PC, has garnered significant attention for its compact design and powerful performance. Its modularity, while enabling user-friendliness, also presents opportunities for DIY repair and modification. This guide explores the intricacies of Steam Deck disassembly and repair, focusing on potential valve-related issues. It aims to provide a safe and informed approach for those seeking to troubleshoot and resolve common problems.Understanding the Steam Deck’s architecture is crucial for effective repair.
The device integrates various components, including a powerful processor, a custom-designed display, and specialized cooling systems. Identifying the critical components and their interactions is essential to diagnose and fix issues.
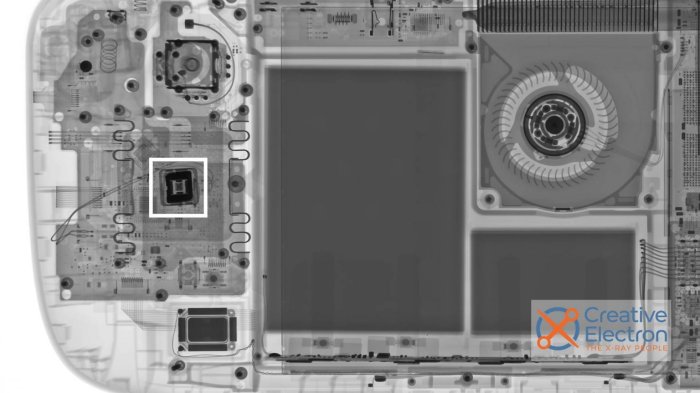
Steam Deck Component Overview
The Steam Deck’s design prioritizes portability and performance. Key components include a custom ARM-based processor, integrated graphics card, solid-state storage, and a high-resolution display. The cooling system, critical for sustained performance, is another important aspect of the design. Potential repair areas include the battery, storage, display, and the thermal paste applied to the CPU and GPU. The Steam Deck’s complex circuitry and the intricate nature of its components highlight the need for a meticulous approach during disassembly and repair.
Common Issues and Failures
Several common issues can affect the Steam Deck’s functionality. These often involve the device’s thermal management system, leading to overheating. Overheating can cause performance throttling, which manifests as stuttering or freezing during gameplay. Other issues include display problems, such as flickering or backlight failure, and storage issues, including data loss or corruption. Problems related to the valve, if any, would be specific to the valve’s function and potential mechanical failures within the device.
Proper diagnosis is crucial for effective repair.
Essential Tools and Materials
A comprehensive toolkit is necessary for safe and effective Steam Deck repair. Essential tools include precise screwdrivers (Phillips and flathead), tweezers, anti-static wrist straps, and a magnifying glass. For more complex repairs, specialized tools might be required. Materials such as thermal paste, replacement display components, or new storage drives might be needed depending on the specific issue.
Proper handling of electronic components is critical to avoid damage and ensure a successful repair.
Safety Precautions
Working with electronic devices requires adherence to specific safety precautions. The static electricity generated from human contact can damage delicate components within the Steam Deck. Using an anti-static wrist strap is essential to ground yourself and prevent static discharge. Carefully handling components and following the proper procedures for disassembling the device minimizes the risk of damage. Understanding the potential risks associated with working with electronic components is vital.
Basic Steam Deck Disassembly Steps
This section details the initial steps involved in disassembling the Steam Deck. This procedure focuses on understanding the basic structural components for safe removal.
- Initial Inspection and Documentation:
- Power Down and Detach External Connections:
- Removing External Components:
- Removing Internal Components:
- Specific Valve Removal Procedure:
Thorough inspection of the Steam Deck for any existing damage or potential issues is critical. Documenting the original condition, noting any unusual marks or signs of previous repairs, aids in accurate assessments.
Before beginning any disassembly, ensure the Steam Deck is powered off and disconnected from any external sources. This preventive measure safeguards against accidental damage or electrical shocks.
The first step often involves removing any easily accessible components, such as the battery, storage, and external accessories. Pay close attention to the securing mechanisms and their orientation for proper reassembly.
Carefully disassembling the internal components, such as the display, hinges, and chassis, is critical. Proper handling and attention to details are vital for a successful repair.
If valve-related issues arise, the specific removal procedure will vary depending on the location and type of valve within the Steam Deck. Detailed information on removing the valve should be sought from the appropriate service manuals or online resources.
Component-Specific Teardown and Repair: Valve Steam Deck Teardown Repair Open
The Steam Deck, with its compact design, presents unique challenges for component-level repairs. This section details the safe removal and replacement of critical components, particularly focusing on the valve system, which plays a vital role in the device’s cooling. Accurate identification and diagnosis are crucial to prevent further damage and ensure proper functionality after repair.
Valve Identification and Related Components
The valve system within the Steam Deck is a crucial part of the cooling mechanism. Identifying the valve and its associated components is essential for safe and effective repair. The valve itself is typically a small, precision-engineered part, often made of metal or a composite material. Look for the valve’s mounting points and connections to the heat sink and other cooling components.
Related components include springs, gaskets, and connecting tubes. Careful examination is needed to identify all these components and their precise locations within the assembly.
Valve Removal and Replacement Procedures
Safe removal and replacement of the valve are critical. First, ensure the Steam Deck is powered off and completely disconnected from any power source. Then, carefully use appropriate tools to disconnect any electrical connections or hoses attached to the valve. Delicate handling is essential, and the use of anti-static precautions is recommended. Thorough documentation of the original component placement and connections is vital for accurate reassembly.
A detailed diagram, showing the valve’s position, connections, and surrounding components, is recommended. This diagram should clearly indicate the order of disassembly and reassembly steps, including precise locations for screws, clips, and other fasteners.
Testing and Diagnosing Valve Issues
Several methods can help diagnose valve-related problems. Visual inspection for leaks or damage to the valve and its components is a first step. Use a pressure gauge to measure the pressure within the valve assembly and compare it to manufacturer specifications. If the pressure is significantly different, it indicates a potential issue with the valve or its connections.
Leak testing with soapy water can also pinpoint leaks around the valve or its connections. This method can visually reveal areas of air or fluid leakage. A multimeter can help identify any electrical issues affecting the valve’s operation.
Replacing Valve Components
Replacing specific components of the valve assembly, such as springs or gaskets, requires precise procedures. The correct spring tension is crucial for the valve’s proper operation. Incorrect spring tension can lead to either under-performance or damage to the system. Using replacement parts from reputable suppliers is crucial for ensuring compatibility and longevity. Consult the Steam Deck repair manual or online resources for precise specifications and procedures for replacing springs and gaskets.
Ever wondered how to open up your Valve Steam Deck for repairs? It’s a fascinating process, and while some might find it intimidating, the teardown is actually quite rewarding. This opens up a world of possibilities, much like the ambitious projects at Rocket Lab, focusing on their reusable launch systems and mega-constellations of satellites. Rocket Lab’s Neutron launch satellite reusable mega constellations are pushing the boundaries of space exploration, reminding us that even complex projects can be approached systematically.
Getting back to the Steam Deck, I’ll delve into the steps for a successful teardown in a future post.
Pay particular attention to the orientation of the components and their precise fit to prevent future problems.
Table of Valve Problems, Symptoms, and Solutions
| Valve Problem | Symptoms | Solutions |
|---|---|---|
| Valve Leakage | Reduced cooling performance, audible hissing or whistling sounds, condensation around the valve | Replace damaged gaskets or seals, repair or replace the valve itself |
| Sticking Valve | Difficulty in opening or closing the valve, increased operating noise | Inspect for debris, lubricate moving parts if possible, or replace the valve |
| Incorrect Spring Tension | Valve does not operate smoothly or efficiently, reduced airflow, overheating | Replace spring with the correct tension, re-adjust the spring to the specified tension |
Troubleshooting and Diagnostics

Troubleshooting Steam Deck valve issues requires a methodical approach, starting with careful observation and progressing to targeted testing. A thorough understanding of potential problems and the correct diagnostic procedures is crucial for efficient repair and restoration of functionality. This section will detail common problems, diagnostic methods, and troubleshooting steps, ensuring safety throughout the process.Valve problems on the Steam Deck, like overheating, performance issues, and leaks, often stem from various factors, including manufacturing defects, improper use, or wear and tear.
Identifying the root cause is essential to effective repair.
Common Valve Problems
Valve-related issues on the Steam Deck often manifest as performance degradation, thermal discomfort, or unusual noises. Overheating, a frequent complaint, can be caused by inadequate cooling solutions, blocked vents, or faulty thermal paste application. Performance dips may arise from various factors, such as compromised valve integrity or clogged channels. Leaks, although less common, can result in fluid escaping, damaging components, and affecting performance.
Diagnostic Methods
Several approaches can be used to diagnose valve-related problems. Visual inspections, multimeter tests, and pressure tests are common tools for assessing valve health. Visual inspection involves closely examining the valve for any visible damage, leaks, or obstructions. Multimeter tests can measure electrical parameters to identify potential circuit issues. Pressure tests evaluate the valve’s ability to maintain pressure, detecting leaks or blockages.
Troubleshooting Steps
A systematic approach to troubleshooting valve issues is essential. Start with a visual inspection, checking for any physical damage, leaks, or blockages. If no visual issues are apparent, proceed to electrical testing, using a multimeter to check for voltage readings. If electrical readings are normal, consider pressure testing to identify potential leaks or blockages. Always follow safety precautions when performing any electrical or pressure tests.
Diagnostic Tools Comparison
| Diagnostic Tool | Description | Application | Limitations |
|---|---|---|---|
| Visual Inspection | Directly observing the valve for damage or leaks. | Identifying obvious physical problems. | Cannot detect internal damage or subtle leaks. |
| Multimeter | Measures voltage, current, and resistance. | Checking electrical connections and components related to the valve. | Requires knowledge of circuit diagrams and component specifications. |
| Pressure Gauge | Measures pressure within a system. | Detecting leaks or blockages in pressurized systems. | Requires specialized equipment and knowledge to use properly. |
Valve Functionality Testing
After valve replacement or repair, thorough functionality testing is crucial. This includes running stress tests on the Steam Deck to verify proper operation under various conditions. Observe the Steam Deck’s performance under load and ensure there are no noticeable issues. Monitor temperature readings to ensure adequate cooling. Check for any unusual noises or leaks to verify the repair’s effectiveness.
So, I finally cracked open my Valve Steam Deck for a teardown and repair. It’s fascinating how much intricate engineering goes into these little machines. Knowing when the OnePlus 10 base model was released is helpful for comparing mobile tech advancements alongside the Steam Deck’s evolution. one plus 10 base model when is a critical piece of context for understanding the overall tech landscape.
Hopefully, this repair goes smoothly and I can get back to gaming!
If any issues persist, repeat the diagnostic steps to identify the source of the problem.
Safety and Ethical Considerations
Tinkering with your Steam Deck, like any electronics repair, requires careful attention to safety. Improper handling can lead to serious injury or damage to the device. This section Artikels the crucial safety and ethical considerations to ensure a successful and safe repair process.Understanding the potential hazards and adhering to strict safety protocols is paramount for a successful and safe repair process.
By acknowledging the risks and following preventive measures, you minimize the chance of accidents and preserve the integrity of your Steam Deck.
Safety Procedures During Teardown
Proper safety procedures are essential during the teardown process. Ignoring these can result in electric shock, cuts, or damage to the device. The following steps should be strictly followed.
- Power Down and Disconnect: Always disconnect the Steam Deck from any power source before starting any disassembly. This is crucial to prevent electrical shocks. Ensure the battery is fully discharged before working on the device to eliminate any residual power.
- Protective Gear: Wear appropriate protective gear, including safety glasses, gloves, and a dust mask. This will shield you from potential hazards such as flying debris, sharp components, and dust particles.
- Static Discharge: Ground yourself before handling any electronic components to prevent static electricity from damaging sensitive circuits. Use an anti-static wrist strap to effectively ground yourself.
- Controlled Environment: Work in a well-lit and clean area to minimize the risk of mistakes. Avoid working in dusty or humid environments.
Hazards Associated with Electronic Components
Working with electronic components presents several hazards. Understanding these risks is vital for preventing accidents.
- Electrical Shock: Electronic components contain high voltages, even when powered off. Improper handling can lead to electric shock. Always ensure the device is disconnected from any power source before starting the repair.
- Sharp Edges: Components and internal structures can have sharp edges. Cuts are a significant concern during the repair process. Always use protective gloves and handle parts with care.
- Fragile Components: Many electronic components are delicate and prone to damage during handling. Careless handling can lead to broken components, requiring additional repair costs or replacement.
- Thermal Issues: Some components can become very hot during operation. Touching them without appropriate protection can cause burns.
Safety Guidelines
Adhering to the following safety guidelines is crucial for a successful and safe repair process.
- Preparation is Key: Thoroughly research the repair procedure before starting the disassembly. Refer to official manuals or trusted online resources for detailed instructions and safety guidelines.
- Use Proper Tools: Select appropriate tools for the task. Use tools designed for electronics work to prevent damage.
- Document Everything: Take detailed pictures or videos of the disassembled device to aid in reassembly. Note the position of each component.
- Work in a Controlled Environment: Maintain a clean and organized workspace to minimize the risk of errors and accidents.
Ethical Considerations
Repairing personal electronics, like the Steam Deck, raises ethical considerations, particularly regarding warranties.
- Warranty Implications: Unauthorized repairs may void the manufacturer’s warranty. This should be carefully considered before undertaking any repair.
- Source of Parts: Using non-original parts might compromise the device’s functionality or safety. Only use verified and reliable parts from trusted sources to avoid unforeseen issues.
- Environmental Responsibility: Consider the environmental impact of repairing versus replacing a device. Repairing can reduce electronic waste and promote sustainability.
Tools and Protective Gear
The following tools and protective gear are necessary for a safe teardown and repair.
| Category | Items |
|---|---|
| Protective Gear | Safety glasses, Gloves, Anti-static wrist strap, Dust mask |
| Tools | Phillips head screwdriver set, Precision tweezers, Spudger, Heat gun, ESD-safe workspace |
Advanced Repair Techniques and Modifications
Diving deeper into Steam Deck repairs, we now explore advanced techniques for tackling complex issues and even modifying the device for enhanced performance or aesthetics. This section focuses on procedures for soldering, circuit board repairs, component replacements, and valve mechanism maintenance. Understanding these methods allows for more comprehensive troubleshooting and personalized modifications.Advanced repairs often necessitate precise tools and meticulous attention to detail.
Improper handling can lead to further damage or compromise the functionality of the Steam Deck. Safety precautions should always be paramount. Thorough research and understanding of the specific components are crucial for successful repairs.
Soldering and Circuit Board Repair
Accurate soldering is vital for repairing damaged components on the circuit board. Incorrect soldering can lead to short circuits, malfunctions, or irreversible damage. A steady hand, precision tools, and appropriate soldering techniques are essential. Practice on scrap circuit boards or in a controlled environment is recommended before attempting repairs on the Steam Deck. Ensure the soldering iron is the correct wattage for the job, and use appropriate flux to prevent oxidation.
Ever tackled a Valve Steam Deck teardown repair open? It’s a fascinating project, but sometimes you need a break from intricate electronics. That’s when exploring other tech, like Android Auto wireless integration with Pixel, Nexus, JVC, or Kenwood devices, comes in handy. For a deep dive into compatibility and features, check out this comprehensive guide on android auto wireless pixel nexus jvc kenwood.
Ultimately, though, the Steam Deck repair is the true focus, and getting back to the task at hand is important.
Always use heat sinks where necessary to prevent overheating of sensitive components during soldering.
Component Replacement
Replacing faulty components is another advanced repair technique. This may involve replacing a capacitor, resistor, or other electrical components. Carefully identify the faulty component and obtain a suitable replacement. Ensure the replacement component meets the specifications of the original component. Consult schematics and datasheets to verify the correct component type.
Adhere to correct component installation procedures to prevent damage to the circuit board.
Valve Mechanism Cleaning and Lubrication
Maintaining the valve mechanism is critical for the Steam Deck’s longevity and smooth operation. A buildup of dust, debris, or grime can cause sticking, jamming, or reduced responsiveness. Cleaning the mechanism with compressed air and a soft brush removes debris. Using a lubricant specifically designed for mechanical components, such as a high-quality dry lubricant spray, ensures smooth operation.
Apply a minimal amount of lubricant to the moving parts. Excess lubricant can attract dust and cause further problems.
Valve Replacement with Custom or Aftermarket Valves
Replacing the valve mechanism with a custom-built or aftermarket valve requires a deeper understanding of the mechanical design and potential modifications. Thorough research and planning are essential to ensure compatibility and functionality. Consider the specific requirements of the custom valve, such as its dimensions, mounting mechanism, and connection points. Precise measurements and careful fitting are necessary for a proper replacement.
If attempting a custom build, ensure the valve meets safety and operational standards. Verify the compatibility of the new valve with the existing Steam Deck’s design and functionality.
Comparison of Repair Methods
| Repair Method | Description | Complexity | Cost |
|---|---|---|---|
| Soldering | Repairing damaged connections | Medium | Low to Medium |
| Component Replacement | Replacing faulty components | Medium | Low to Medium |
| Valve Mechanism Cleaning | Maintaining valve function | Low | Low |
| Valve Replacement (Custom/Aftermarket) | Replacing with custom or aftermarket valve | High | Medium to High |
Visual Aids and Illustrations
Visual aids are crucial for understanding and performing Steam Deck repairs. Clear diagrams and illustrations help to visualize complex components, identify critical steps, and ensure accurate execution of procedures. This section details the importance of visual aids in a Steam Deck repair guide, focusing on the clarity and precision required for effective troubleshooting and repair.s should not just describe the images, but also connect them to the overall repair process and the functionality of the components.
The goal is to empower readers to confidently tackle repairs, not just passively observe them.
Internal Component Diagrams
Detailed diagrams of the Steam Deck’s internal components are essential for visualizing the layout and interconnections. These diagrams should clearly label all significant parts, including the motherboard, battery, heat sinks, and various connectors. Each component should be labeled with a clear and concise description, enhancing the understanding of its function within the Steam Deck’s overall operation. The use of consistent color-coding for different components and connections significantly improves readability and comprehension.
Valve Type Diagrams
Different valve types, if applicable to the Steam Deck’s design, require specific diagrams. These diagrams should showcase the unique construction, including the valve body, springs, and actuators. The diagrams should clearly illustrate the different components and their relationships to highlight the specific functionalities of each valve type. Specific details of each valve’s role within the Steam Deck’s operation, and its connection to the broader system, should be emphasized.
Valve Function and System Integration, Valve steam deck teardown repair open
A crucial diagram should illustrate the valve’s function within the overall Steam Deck system. This includes how the valve interacts with other components, such as the cooling system or other critical parts of the Steam Deck. The diagram should clearly illustrate the flow of air or other critical substances through the valve and its impact on the Steam Deck’s performance.
Furthermore, this illustration should highlight the valve’s critical role in maintaining optimal temperatures and preventing overheating, vital for the Steam Deck’s long-term performance and user experience.
Tools and Materials Diagram
A comprehensive diagram showcasing the necessary tools and materials for Steam Deck repairs is vital. This should include images of screwdrivers (Phillips and flathead), heat sinks, thermal paste, replacement parts, and any other specialized tools. The diagram should clearly show the appropriate tool for each step, ensuring that readers understand the necessary equipment and avoid damaging the device.
The image should provide detailed views of the tools to facilitate proper identification.
Completed Repair Diagram
A diagram of a completed repair showcasing the valve replacement and new components is necessary. This should include the original and replaced components, ensuring that the reader can see the differences and the new configuration. Clear labels should identify each component and their position in the final setup, providing a visual representation of the completed repair process. The image should emphasize the restored functionality and the overall improved condition of the repaired Steam Deck.
Outcome Summary
In conclusion, this comprehensive guide provides a thorough overview of the Valve Steam Deck teardown and repair process. From initial disassembly to advanced modifications, we’ve covered various aspects, including safety precautions, troubleshooting, and diagnostics. We’ve Artikeld the necessary tools, detailed procedures, and addressed common problems. Now, armed with this knowledge, you can confidently tackle repairs and maintain your Steam Deck.
Remember, safety and precision are key to a successful outcome.