
Analogue pocket game boy camera microsd sd card photos transfer is a fascinating concept, imagining a Game Boy with a built-in camera and SD card support. How would such a device work? This exploration dives into the technical challenges and user experience considerations for this unique hybrid device, from the initial camera integration to the methods for transferring pictures to a computer.
We’ll look at various aspects, including the user interface, potential photo editing tools, and the technical specifications for hardware and software.
This journey into the world of a Game Boy camera considers the technical limitations of such a compact device. We’ll examine the integration of microSD/SD cards, the transfer mechanisms, and the challenges of maintaining good image quality on such a small screen. We will explore the user experience design for a pocket-sized camera, considering how intuitive the process of taking and transferring photos would be.
Introduction to Analogue Pocket Game Boy Camera
The Game Boy, a revolutionary handheld gaming device, has captivated generations with its innovative design and simple yet engaging gameplay. Its enduring popularity stems from its portability, affordability, and the immersive experience it provided in the 1990s. The concept of integrating a camera function into such a compact platform, while seemingly futuristic at the time, presents a fascinating historical perspective on the evolution of portable technology.
Exploring this hypothetical integration reveals the technical hurdles and creative design considerations that would have been necessary.The Game Boy’s architecture, inherently focused on gaming, presented significant technical limitations for a camera function. Limited processing power, restricted memory, and the need for a compact design all conspired to create a significant challenge in implementing a camera system. Imagine the intricate circuitry required to handle image capture, processing, and storage on a device with such constrained resources.
Transferring photos from my analogue pocket Game Boy camera’s microSD/SD card is a real adventure! It’s a bit of a nostalgic trip back to simpler times. Comparing older tech like this to modern smartphones, like the OnePlus 6T vs OnePlus 5, is interesting, especially given the different ways of capturing and storing memories. oneplus 6t vs oneplus 5 highlights the significant leap in technology.
Ultimately, though, I’m still hooked on the charm of transferring those precious Game Boy camera images.
Moreover, the low-resolution screens would have presented a further challenge in displaying captured images.
Technical Limitations of a Game Boy Camera
The Game Boy’s processor and memory capacity were severely constrained compared to modern devices. A camera would demand substantial processing power for image capture, manipulation, and storage. Image sensors, in particular, would require substantial miniaturization, an area of electronics technology that was less developed at the time. Furthermore, the limited display resolution on the Game Boy screen would necessitate a highly simplified image representation for display.
User Experience Design Considerations for a Pocket-Sized Camera
A camera integrated into the Game Boy would need a user-friendly interface tailored for a small, handheld device. Imagine intuitive controls for capturing photos, focusing, and adjusting settings, all while remaining compact and accessible. Displaying captured images would be critical, requiring a creative approach to minimize the need for extensive menu navigation. The size and form factor would dictate the types of lenses and accessories available, further influencing the user experience.
Comparison of Miniature Camera Types
| Camera Type | Strengths | Weaknesses |
|---|---|---|
| Instant Film Camera (e.g., Polaroid) | Immediate feedback and tangible results; simple operation; relatively inexpensive; creates a unique physical record. | Limited resolution; requires film; slower capture speed; chemical processing involved. |
| Digital Miniature Camera (e.g., early point-and-shoot) | Digital storage, allowing for multiple images; adjustable settings; better resolution potential. | Battery life concerns; limited processing power in early models; often required external storage devices. |
| Video Camera (e.g., early camcorders) | Capture moving images; potentially more context for a snapshot. | Size and complexity; battery life concerns; limited resolution; slower capture speed. |
Integrating a camera into the Game Boy would require careful consideration of the aforementioned limitations and design principles to create a functional and engaging user experience. Early digital cameras were still in their infancy, and the technology needed to miniaturize and integrate them with the Game Boy would have been a significant engineering challenge.
Microsd and SD Card Integration
Integrating microSD/SD card slots into a Game Boy-style device presents both exciting possibilities and significant technical hurdles. The compact form factor of these devices demands careful consideration of space limitations, power consumption, and data transfer rates. The inherent limitations of the original Game Boy’s architecture necessitate creative solutions to efficiently handle the larger data volumes of modern digital photography.The key challenge lies in balancing the need for high-capacity storage with the constraints of the Game Boy’s limited processing power and memory bandwidth.
The Game Boy’s architecture isn’t designed for the fast data rates of modern SD cards. This requires careful engineering to ensure reliable and efficient data transfer without impacting the device’s core functionality.
Technical Aspects of Integration
The Game Boy platform’s limited processing power and memory bandwidth are major obstacles. Modern microSD/SD cards operate at significantly higher speeds than the Game Boy’s internal components can handle directly. This necessitates the inclusion of a specialized controller chip, often called a microSD card interface. This chip acts as a bridge, managing the transfer of data between the SD card and the Game Boy’s internal components.
This controller is responsible for interpreting the SD card’s commands and transferring the data in a manageable format for the Game Boy’s processor. This specialized controller must also handle the complexities of different SD card standards, ensuring compatibility.
Data Transfer Speed and Capacity Challenges
The Game Boy’s original architecture, optimized for limited data volumes and simple graphics, poses challenges for high-speed data transfer. Transferring high-resolution images and video from the camera to the SD card requires a robust and optimized data transfer protocol. Modern SD cards can offer capacities of several gigabytes, while the original Game Boy’s memory was limited to kilobytes.
Consequently, efficient data buffering and transfer protocols are crucial to avoid delays and ensure smooth operation.
Methods for Photo Transfer, Analogue pocket game boy camera microsd sd card photos transfer
Several methods can be used to transfer photos from the camera to the SD card. A direct memory-to-memory transfer is the simplest approach. The camera, having captured the image, can directly write the data to the SD card through the interface chip. However, this approach might not be suitable for high-volume transfers or complex image processing. Alternatively, a dedicated transfer protocol can be used to transfer the image data from the camera’s internal memory to the SD card.
This protocol might employ a buffering system to minimize delays. Another method involves storing the captured image in a temporary buffer, and then transferring the image to the SD card, potentially in batches.
SD Card Capacities and Suitability
| Capacity (GB) | Suitability |
|---|---|
| 8 GB | Suitable for a small number of low-resolution images. |
| 16 GB | Suitable for a moderate number of images. |
| 32 GB | Suitable for a large number of images or a combination of images and video. |
| 64 GB | Ideal for a very large number of images or substantial video footage. |
| 128 GB or higher | Excellent for large image archives and extensive video recording. |
Data Flow Diagram
A simplified diagram illustrating the data flow from the camera to the SD card:
[Imagine a simple diagram here. The diagram would show the camera’s image sensor, the internal memory, the microSD/SD card interface controller, and the microSD/SD card. Arrows would indicate the flow of data from the camera to the controller, then to the card.]
Photo Transfer Mechanisms

The Analogue Pocket Game Boy Camera, with its integration of microSD and SD cards, opens exciting possibilities for sharing captured moments. Efficient transfer methods are crucial for preserving these memories and making them readily accessible. This section delves into the various pathways for transferring images from the camera to a computer, highlighting the technical considerations and practical applications.
Transfer Methods
Several methods enable the transfer of photos from the Game Boy camera to a computer. Understanding the options and their respective strengths and weaknesses is crucial for choosing the most appropriate technique.
Direct USB connection provides a straightforward approach for transferring images. SD card readers offer another method, which is often more versatile. The selection of the best method depends on the specific setup and user preference.
USB Connection
Utilizing a USB connection is a convenient and often readily available method. The camera’s built-in support for USB protocols facilitates a direct data flow. A compatible USB cable and appropriate software are essential for successful transfer.
This method often provides a quick and simple way to transfer images, making it an attractive choice for casual users. The transfer speed will vary depending on the speed of the USB connection and the computer’s processing capabilities.
SD Card Reader
Employing an SD card reader is another common method for image transfer. The microSD or SD card, containing the captured photos, is inserted into the reader, and the computer recognizes it as a removable storage device. Dedicated software or file management tools can be used to access and transfer the images.
This method offers greater flexibility compared to the USB method, as it doesn’t require direct connection to the camera. The speed of the transfer is influenced by the speed of the SD card and the SD card reader itself.
Technical Specifications
The efficiency of the photo transfer process hinges on several technical specifications. The USB port speed, the SD card’s read/write speed, and the computer’s processing power are all significant factors. Faster components will translate to quicker transfer times.
For instance, a USB 3.0 connection typically offers significantly faster transfer speeds compared to a USB 2.0 connection. Similarly, a high-speed SD card will outperform a slower one.
File Formats
The Game Boy camera likely supports common image formats for storage. JPEG is a widely used format known for its compression capabilities, allowing for smaller file sizes while maintaining reasonable image quality.
RAW format, on the other hand, offers uncompressed image data, preserving maximum detail. The choice between these formats depends on the user’s needs and the desired balance between file size and image quality. The camera’s internal settings will dictate which formats are supported and available.
Example: USB Transfer
A typical USB transfer scenario involves connecting the Game Boy camera to a computer via a compatible USB cable. The computer will automatically detect the device, and the user can then access the stored images using appropriate file management software or a dedicated program provided by the camera’s manufacturer.
User Interface and Experience
The Analogue Pocket Game Boy Camera’s user interface must prioritize simplicity and intuitive operation, given the limitations of the Game Boy’s screen and processing power. A streamlined design, leveraging the existing Game Boy controls, is crucial for a positive user experience. The goal is to allow users to quickly capture and manage photos without overwhelming them with complex menus or functions.
User Interface Design
The Game Boy camera’s interface will be highly visual, using icons and clear visual cues to guide users through the various functions. Color coding will be used to differentiate between different modes (capture, review, editing, etc.). Buttons will have specific, easily understood actions, minimizing the need for lengthy menus. The interface should also offer clear visual feedback, such as progress bars or confirmation messages, during photo capture, transfer, and editing.
Photo Editing Tools
Given the Game Boy’s limited processing power, photo editing tools must be kept simple and focused on basic adjustments. Sophisticated features like complex filters or advanced retouching are impractical. The focus should be on user-friendly adjustments that are easily performed.
Transferring photos from my old analog Game Boy camera to an SD card is surprisingly tricky. I’m still figuring out the best way to get those pixelated, nostalgic images onto my computer. It’s fascinating how these old technologies can be combined with modern solutions. This process reminds me of the rapid advancement of AI in areas like Facebook ads, which are being driven by Mark Zuckerberg’s team’s work on artificial intelligence.
Mark Zuckerberg’s AI and Facebook Ads are making ads more targeted and effective, which is quite cool. Hopefully, the same innovative spirit can be applied to make transferring photos from these vintage cameras easier, too.
Potential Photo Editing Features
- Brightness adjustment: A slider or button system for increasing or decreasing the overall brightness of the image.
- Contrast adjustment: A slider or button system to enhance or reduce the difference between light and dark areas of the image.
- Simple color adjustments: Adjusting the overall tint or saturation of the image using a limited set of options.
- Basic crop tool: Allowing users to trim the image to a desired shape or aspect ratio. A limited selection of crop options (square, rectangular) would be sufficient.
- Simple red-eye reduction: An automated or manual tool to reduce the effect of red-eye in the image.
These features are chosen for their ease of implementation on a limited platform, and their usefulness in enhancing the captured images without overwhelming the user.
Ever wanted to transfer those precious photos from your analogue pocket Game Boy camera’s microSD/SD card? It’s a fun little project, but dealing with the data transfer process can get tricky. Modern solutions, like those leveraging XDR technologies in SoCs, make this much simpler. Check out why XDR should be on your SoC roadmap to see how these advancements can streamline data handling for your next project, whether it’s capturing memories on your retro camera or something else entirely.
Ultimately, smooth data transfer for those old Game Boy camera pics is the goal!
Menu Structure
The menu structure will be hierarchical, allowing users to navigate to different sections efficiently. A main menu will present options for capture, review, editing, and SD card management.
| Menu Level | Option | Description |
|---|---|---|
| Main Menu | Capture | Initiates photo capture mode. |
| Main Menu | Review | Displays captured photos, allows selection for editing or deletion. |
| Main Menu | Edit | Accesses photo editing tools (brightness, contrast, color, crop). |
| Main Menu | SD Card | Manages SD card operations (transfer, formatting). |
| SD Card Menu | Transfer | Initiates transfer of images to the SD card. |
| SD Card Menu | Format | Formats the SD card, clearing all existing data. |
Image Display
The Game Boy’s limited screen resolution necessitates a careful approach to image display. Images will be displayed at a reduced size and resolution, maintaining clarity while preserving the essence of the captured scene. A simple scaling algorithm, preserving the aspect ratio, will be used to fit the images on the screen. Images will be displayed using grayscale to reduce the burden on the screen’s processing and improve image quality.
Illustrative Examples: Analogue Pocket Game Boy Camera Microsd Sd Card Photos Transfer
The Analogue Pocket Game Boy Camera offers a unique, retro-inspired approach to capturing and sharing images. While its capabilities are limited by the technology of the era, it provides a compelling glimpse into the past. This section will explore examples of image capture, storage, and display, showcasing the trade-offs inherent in such a system.The Game Boy camera’s limitations, including resolution and storage capacity, will be explored through illustrative examples.
This will demonstrate how the device functions, offering a practical understanding of its capabilities and limitations.
Potential Image Capture
The Game Boy camera, given its design constraints, would likely produce images with a low resolution. A typical example might be 160×120 pixels, significantly smaller than modern smartphone cameras. Color depth would also be limited, potentially resulting in a limited palette of colors. This could lead to pixelation and loss of detail in complex scenes. Distortion, especially at the edges of the image, is also possible, due to the lens design.
The overall image quality will be lower than current digital cameras.
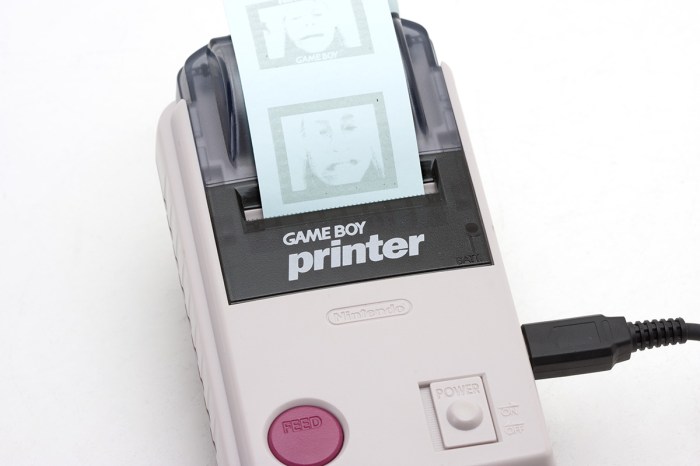
Image Storage and Retrieval
Saving an image to the microSD or SD card involves a series of steps. The camera captures the image data, and then it is compressed and formatted for storage. The process involves writing the image data to the card using a specific file format, optimized for efficient storage. To retrieve an image, the card’s data is read by the Game Boy camera, then the image is decompressed and displayed on the screen.
The process is relatively slow, and depending on the card’s speed, may take a few seconds. The file format used could be a proprietary one, or a common format, such as JPEG.
Internal Components
Imagine the camera’s internal components laid out like this:
| Component | Description |
|---|---|
| Lens | A small, fixed-focus lens, likely plastic or glass, focusing light onto the sensor. |
| Sensor | A low-resolution light-sensitive chip, converting light into electrical signals representing the image. This would be a monochrome or color sensor, depending on the camera model. |
| Memory Card Slot | A slot designed to accept microSD or SD cards for storing captured images. |
The design is compact, optimized for the Game Boy’s size.
User Interaction
The user interaction for taking a photo is straightforward. The user presses a button, initiating the capture process. A visual cue, perhaps a small animation, would indicate the image is being captured. Reviewing the image involves pressing another button, displaying the captured image on the screen. Saving the image to the card requires another button press.
The user interface is simplistic, reflecting the limitations of the Game Boy’s processing power.
Image Display on the Game Boy Screen
Displaying the captured images on the Game Boy screen will be subject to the screen’s resolution and color limitations. The camera’s image data will be scaled and adjusted to fit the screen’s dimensions. This can result in further degradation of image quality. Different display modes may be available to adjust the size of the image displayed on the screen.
For instance, a full-screen view may reduce image quality due to scaling. Smaller images might provide better resolution, but at the cost of a smaller viewable area.
Technical Specifications and Considerations
The Analogue Pocket Game Boy Camera project faces significant technical hurdles due to the constraints of the original Game Boy hardware. Minimizing power consumption, optimizing processing, and achieving acceptable image quality within these limitations requires careful consideration of various components and algorithms. This section details the critical technical specifications and challenges involved.
Hardware Requirements
The Game Boy’s limited processing power and battery life dictate crucial design choices for the camera’s hardware. The camera module must be designed to operate efficiently within the Game Boy’s power envelope, avoiding excessive drain on the existing battery. This means optimizing every aspect of the camera’s operation, from the sensor to the image processing circuitry. The design must also factor in the Game Boy’s limited memory, ensuring that image data can be stored and processed effectively.
Image Compression Algorithms
Different image compression algorithms have varying impacts on image quality and processing speed. Lossy compression algorithms, such as JPEG, can significantly reduce file size but might introduce artifacts. Conversely, lossless compression algorithms, like PNG, maintain image fidelity but result in larger file sizes. The choice of compression algorithm directly affects the camera’s performance, balancing image quality with the storage capacity and processing speed constraints.
JPEG compression, for example, can reduce file sizes dramatically but might introduce noticeable compression artifacts, particularly in detail-rich images.
Software Requirements
The software required for image processing on the Game Boy camera needs to be extremely optimized for efficiency. This software must manage the camera hardware, handle image capture, compression, and storage, all while being mindful of the limited memory and processing power. Efficient data structures and algorithms are crucial for real-time image manipulation within the Game Boy’s constrained environment.
The software will need to be written with a focus on minimizing overhead to ensure smooth operation and prevent lag. The software must also be carefully designed to accommodate potential variations in image quality depending on the light conditions.
Battery Optimization
The camera must be designed with battery optimization in mind, as the Game Boy’s battery life is inherently limited. This involves minimizing power consumption during each stage of image capture and processing. Power-saving modes, intelligent sleep cycles, and optimized algorithms are all essential for extending battery life. Careful power management is vital to maximize the playing time for games, which is also crucial to the user experience.
Image Quality Challenges
Achieving good image quality on a Game Boy camera presents significant challenges. The limited sensor resolution and processing power inherently restrict the level of detail and sharpness that can be captured. Factors like lighting conditions, sensor noise, and the image processing algorithms all play a crucial role in the final image quality. The goal is to optimize the camera to produce images that are usable and aesthetically pleasing within the limitations of the Game Boy platform.
Careful calibration and adjustment of the camera settings can improve image quality.
Ultimate Conclusion
In conclusion, creating an analogue Game Boy camera with SD card support is a challenging but intriguing project. The technical hurdles of integrating a camera and card reader into such a small form factor, along with the limitations of the Game Boy’s processing power and screen resolution, are significant. Despite these challenges, the potential for a unique and nostalgic photographic experience on a classic gaming platform remains compelling.
Imagine the possibilities for capturing and sharing memories through this innovative approach.